This “lab” shouldn’t take long, and you’re not graded on it.
But you do still need to do it, so that you’re ready for lab 1 next week.
1. Getting and installing Logisim
You must use my modified version of Logisim! Not the one from cburch.com! Don’t just google Logisim!
Go to the Software page and download the version of Logisim appropriate for your computer.
Platform-specific instructions follow:
Windows users
If you have a previous version of Logisim installed, first you need to uninstall it. Start, type “add remove”, run “Add or Remove Programs,” search for Logisim, click the three dots on the right, and uninstall. No, this will not delete any of your data.
- Run the
.exefile you downloaded. If it whines about it being “unverified” or whatever:- click “More”
- click “Run Anyway”
- It will install Logisim. That’s all it does. It might not even seem like anything happened, but no news is good news.
- Then open the Start menu and run it.
- It might be on the “recently installed” list, or you can type “Logisim” to find it.
That should be it. You can pin it to the taskbar if you want to be able to run it more quickly in the future.
macOS (Apple) users
If you have a previous version of Logisim installed, first you need to uninstall it. Open Finder, Go > Applications, look for Logisim, and then delete it (select it, ⌘delete, or drag to recycle bin). No, this will not delete any of your data.
- Run the
.dmgfile you downloaded. - Drag the Logisim icon into the Applications folder.
- Eject the
.dmgfile. (Ask for help if you don’t know how)
Now, you have to tell macOS to let you run the program. You only have to do this the first time you run Logisim:
- Go into your Applications folder.
- Right-click the Logisim icon, and click Open.
- Click “Open Anyway” or whatever it says.
- On newer versions of macOS, this will not work. Instead:
- Open System Preferences
- Go to Privacy & Security
- Scroll down until you see the message
"Logisim_2241_1103" was blocked from use because it is not from an identified developer.", and click Open Anyway. - Then it’ll ask for your password/fingerprint…
- …and then ask you to click Open Anyway, and then it’ll work.
From now on, you can just run it normally (e.g. pin it to the dock, or ⌘Space, type logisim, hit enter)
Linux Users (including Chromebooks!)
You need to have a modern Java runtime environment installed. I think Java 11 is the oldest version that Logisim will work with, but even that’s pretty old by now. Check with java -version.
Try just double-clicking the .jar file. If that doesn’t work, you can run the it from the shell like:
java -jar Logisim_2241_1103.jar
The Logisim Interface
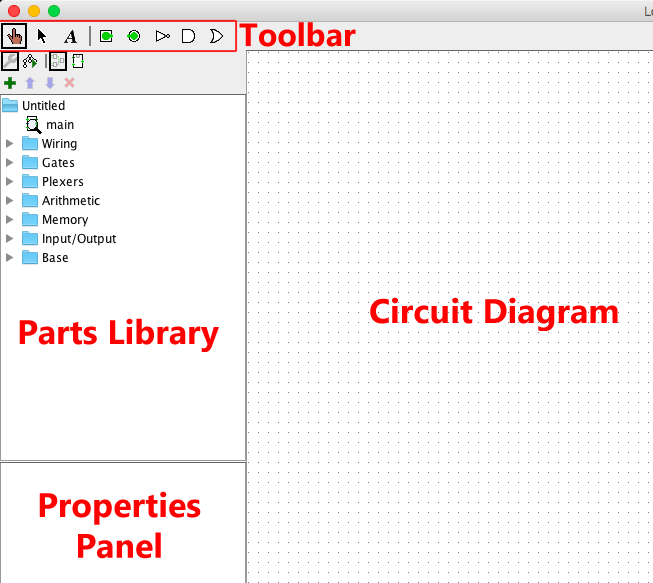
When you run Logisim, it looks like the image to the right.
The circuit diagram is where you do your work.
The parts library is just that - a collection of parts that you can add to the circuit diagram. (You can create your own, too!)
The properties panel is how you set the properties of parts in the circuit (changing their name, or appearance, or how many bits etc.).
And the toolbar contains the three main tools (hand, arrow, text) and shortcuts to some commonly-used parts: inputs, outputs, and the NOT, AND, and OR gates.
2. Making and testing a circuit
To make a circuit, you place components in the circuit diagram, then connect them with wires.
In the toolbar, you will see these two buttons. The square button creates an input, and the round button creates an output.

- Create two inputs and one output.
- Click the input button, then click in the circuit diagram. Then repeat.
- Do the same for the output.
- Create an AND gate between the inputs and output.
- The AND gate is the D-shaped tool in the toolbar.
- Click and drag on the components to move them around. Put the inputs (square) to the left of the AND gate, and the output to the right of it.

Everything is probably really tiny and hard to see. You do not have to strain your eyes to use Logisim. In the bottom left corner, you’ll find the zoom control.
Zoom in by clicking the up arrow on the zoom control. The dots to the right of the arrows are a button that toggles the dot grid in the circuit diagram.
Now you should have something like this, zoomed in big enough to see:

See the colored dots on the sides of the components? That is where the wires will connect.
- Click and drag from the colored dot on the side of one of the square inputs.
- This draws a wire.
- Drag the end of the wire to one of the AND gate’s input dots.
- Do the same for the other square input.
- Then connect the output of the AND gate to the round output.
You should have something like this:
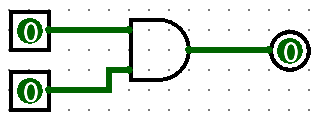
The circuit is now done.
The main toolbar tools and testing your circuit

- The 👆hand is the poke tool (Ctrl+1 or ⌘1). It’s used for looking at your circuit and interacting with it (changing input values, pushing buttons etc), but you can’t edit the circuit with it.
- You can use this to test your circuit now! Use the hand tool to poke the inputs (the squares on the left.) They will toggle between 0 and 1. When both inputs are 1, the output becomes 1.
- If you try to poke the output on the right, nothing happens. Because they’re outputs. You can’t change them.
- The arrow is the edit tool (Ctrl+2 or ⌘2). This is what you change your circuit with. You can select things, move them around, copy and paste them, create and destroy wires, all kinds of stuff.
- This is what you were using before.
- The A is the text tool (Ctrl+3 or ⌘3). You can use it to create/edit “comments” on your circuits.
- Try it out. Put some Words on your Circuit. Truly groundbreaking stuff.
3. Saving
This circuit has not yet been saved. So if you exit Logisim, it’s gone forever.
You need to save (Ctrl+S/⌘S, or File > Save) the file into your personal files:
- Name the file
aaa111_lab0, whereaaa111is your username, and hit Save.- Do not name your file
aaa111_lab0. That is an example. - I would name mine
jfb42_lab0. Yours will be named something else.
- Do not name your file
- Then choose the right location:
- Windows users:
- Drop down the “Save in” box. Your
DesktopandDocumentsfolders are in there. Pick whichever location you want.
- Drop down the “Save in” box. Your
- macOS users:
- Below the “Save As” where you typed in the filename, drop down the box and go to “Macintosh HD”. From there, go into
Users, and then into the folder named whatever your username is. - Your
DesktopandDocumentsfolders are in there. Pick whichever location you want. Be sure to say “Allow” to any “Logisim would like to access…” dialogs that pop up.
- Below the “Save As” where you typed in the filename, drop down the box and go to “Macintosh HD”. From there, go into
- Linux users: your files are in
/home/<your username>but you probably knew that.
- Windows users:
- Finally, hit Save.
If you get a “Could not save file: java.io.FileNotFoundException (Read-only file system)” box when you try to save, you skipped the above instructions. You can’t put your file there. You have to save it to your personal files.
You can double check by navigating to wherever you saved in Explorer/Finder and you should see that file there.
4. Submitting
This lab isn’t graded, but I wanna make sure you know how to submit before the first “real” lab.
- On Canvas, go to “Assignments” and click Lab 0.
- It will show a Gradescope thing inside the lab window. Upload your lab 0 file there.
If you need to resubmit, that’s fine, just do it again.