In this project, you will be implementing a memory allocator. You’ll be making your own versions of the malloc and free functions! Yay! Fun!
This project gives many people a lot of difficulty. Do not wait to start it.
Start early, and get help when you get stuck.

You can’t compile this project on your Mac.
There is no sbrk() or brk() on macOS.
Please do not ask questions about why you get linker errors or deprecation warnings.
This is because you’re trying to compile it on your Mac.
You can still write the code on your Mac, but you have to upload and test on thoth.
You learned how to do this in lab 2. If you haven’t started doing that yet, do it now.
Grading Rubric
- [10 points] Code style
- Split those functions up, and reuse common functions.
- Don’t put low-level functionality in high-level functions. Use the functions you write.
- [10 points]
./driver 1(test_writing) works correctly- this means it at least returns pointers to valid memory, and is probably moving the break.
- [20 points]
./driver 2(test_reuse) works correctly- some kind of reuse algorithm is implemented, and it’s not incorrectly moving the break when freeing blocks that aren’t the tail.
- [10 points]
./driver 3(test_first_fit) works correctly- first-fit works correctly.
- [20 points]
./driver 4(test_splitting) works correctly- splitting reused blocks is implemented correctly.
- [20 points]
./driver 5(test_coalescing) works correctly- coalescing freed blocks is implemented correctly.
- [10 points]
./driver 6(test_bigone) works correctly- allocator is stable enough to be given a real workload!
0. Starting off
- Make a new directory for this project on thoth.
- Here are the starting materials for you to
wgetand unzip. - Do
make testallto compile the program and run all the tests.
It should compile successfully; then it will try running the tests, and they will all segfault.
What is make? What is Makefile?
make is a very popular automatic build system. It automates the drudgery of running the compiler every time you change something in your program’s source code. It’s like the compile.sh I gave you before, but way more than that.
The Makefile in the starting materials is a sort of “program” for make to run. You can look at it if you like, it’s just plain text, but you don’t have to change it.
Inside it I’ve given you a few…
Makefile targets
These are the targets available to use with make:
make- just compiles the driver program (including your allocator).make clean- cleans up files created by compilation.make testall- compiles the driver program and runs all 6 tests.
Using the driver program
The driver program just takes a number in the range 1 to 6, which is the number of the test to run. For example:
./driver 1
runs the first test (test_writing).
Since you will likely be running one test at a time, a useful command will be:
make && ./driver 1
The && in bash:
- runs the first command (here,
make) - if that command is successful (the program compiled!), runs the second command (
./driver 1)
This way you can change your code, then run this line again, and it will compile and run the given test in one command.
The Break
When any process first starts running, its (virtual!) address space will look something like this:
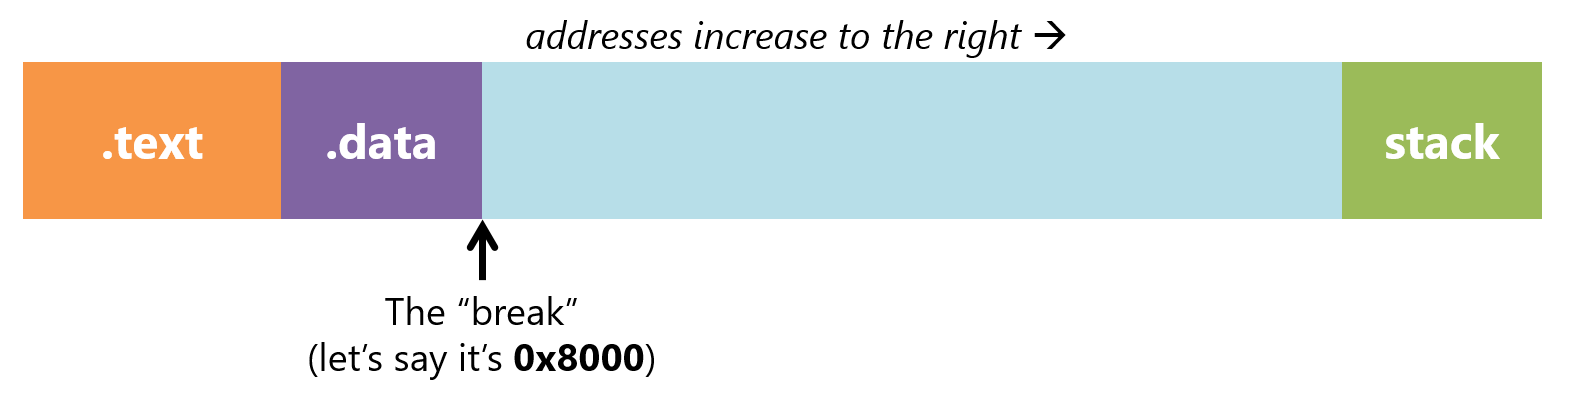
The “break” represents the “frontier” between the memory that your process does have access to, and the empty, unallocated space that it doesn’t have access to. (Accessing addresses in the large middle region would result in a segfault.)
We can ask the OS for more space dynamically by moving the break up. We can do this with the sbrk function.
When you call sbrk(n), it will move the break up by n bytes and return the old location of the break.
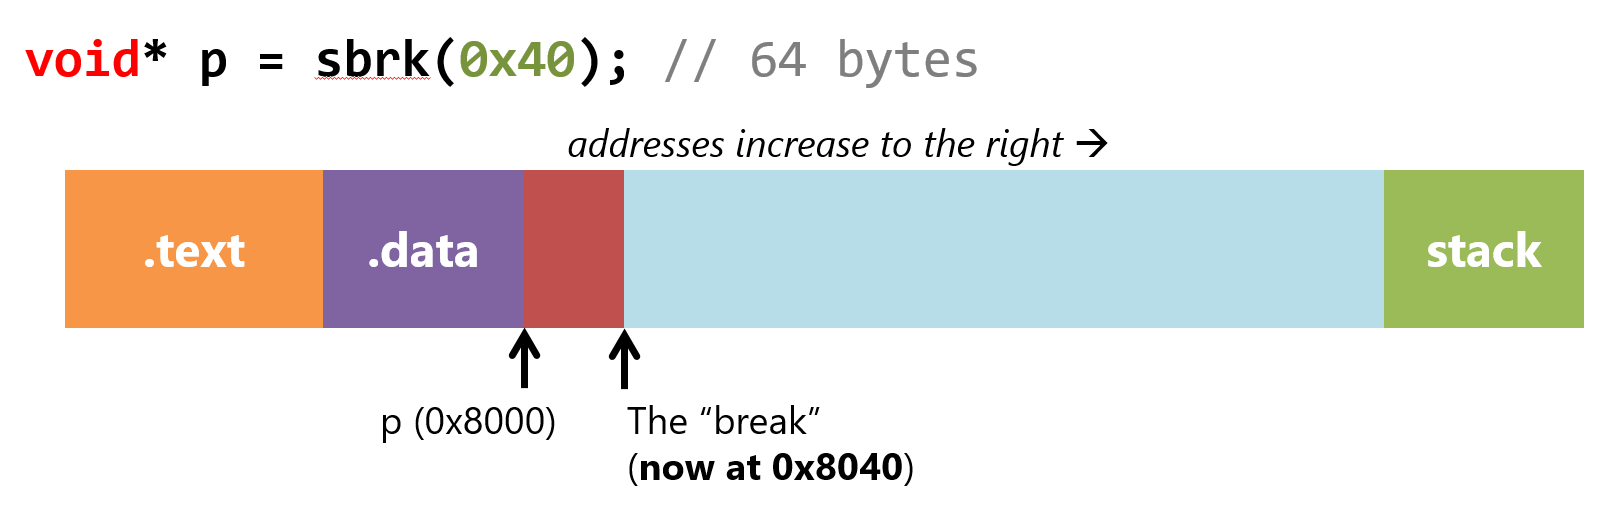
Now, p points to a brand new block of 64 bytes. This new memory space is the heap! We can make the heap bigger by moving the break up, or make it smaller by moving the break down. However, we are entirely responsible for managing the memory within the heap. The OS won’t do it for us.
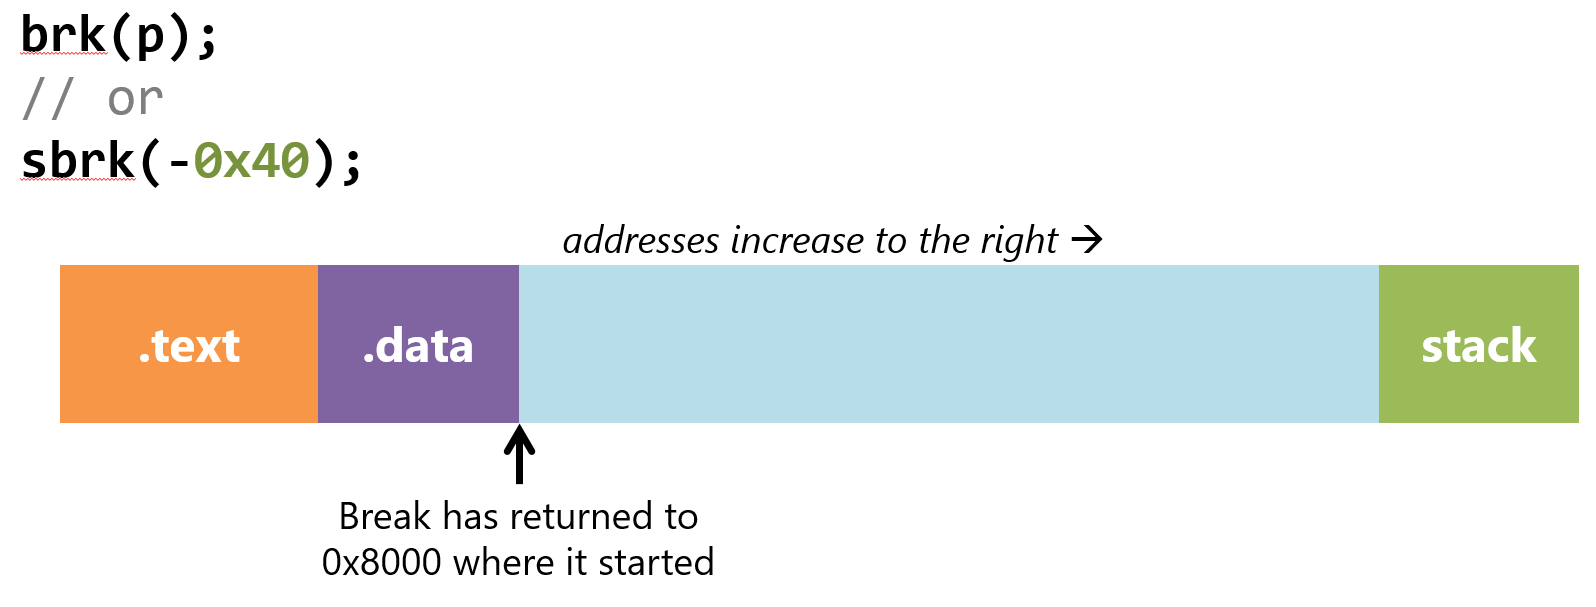
If you want to give heap memory back to the operating system, you do it by moving the break back down. We call this “contracting” the heap. There are two ways to contract the heap: either use the brk system call to set the break to a certain address, or use sbrk with a negative offset to move it backwards.
In this diagram, using brk(p) with the p pointer from the above diagram would set the break to where it started; and sbrk(-0x40) would do the exact same thing.
Heap Blocks
Your heap will be divided into blocks. The blocks will be in a doubly-linked list. Each block can be either free (ready for reuse) or used (someone malloc‘ed it and is still using it).
A block has two parts: the header and the data. Each header contains the following information:
- The size of the data part
- NOT the size of the data + header!
- Whether this block is in use (allocated) or not (free)
- The pointer to the next block
- The pointer to the previous block
The Header struct in mymalloc.c represents the header of a block. However, the header struct does not contain the data part of a block. In memory, the header will be before the data part.
Your allocator does not care about the data part. That’s just for the user program to use!
The doubly-linked list
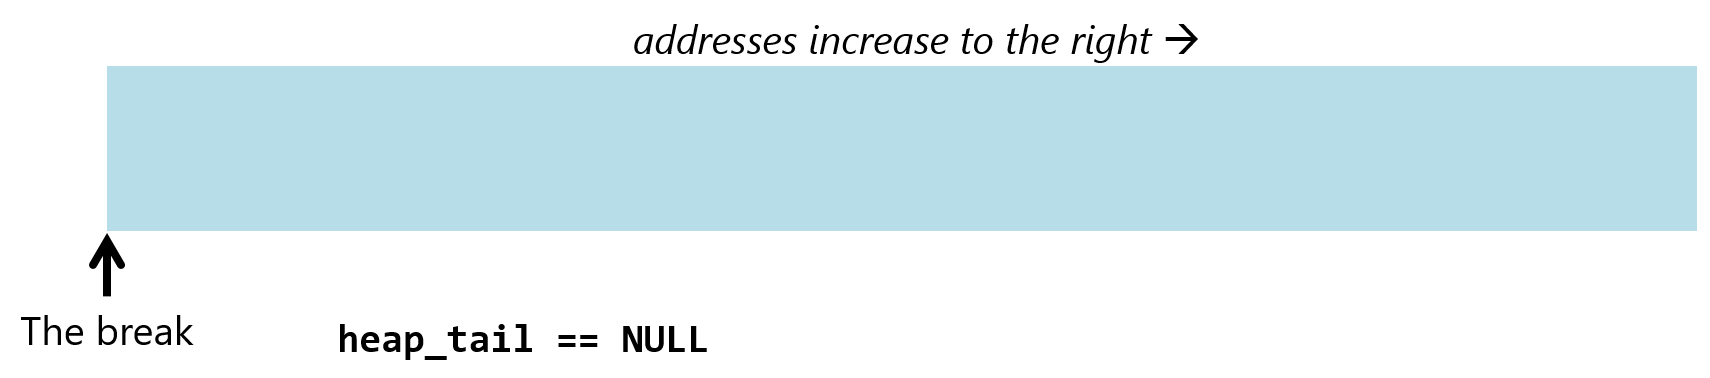
Note: these diagrams only show the tail, but you need to keep track of the head too.
When the program first starts and the heap is empty, your linked list will also be empty:
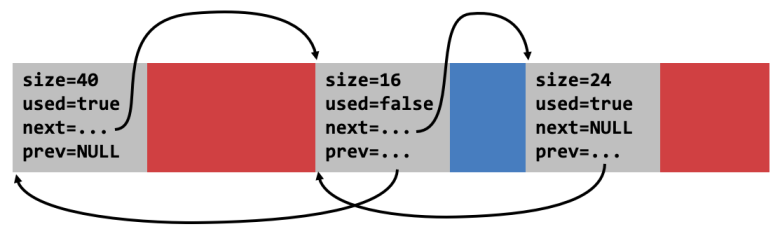
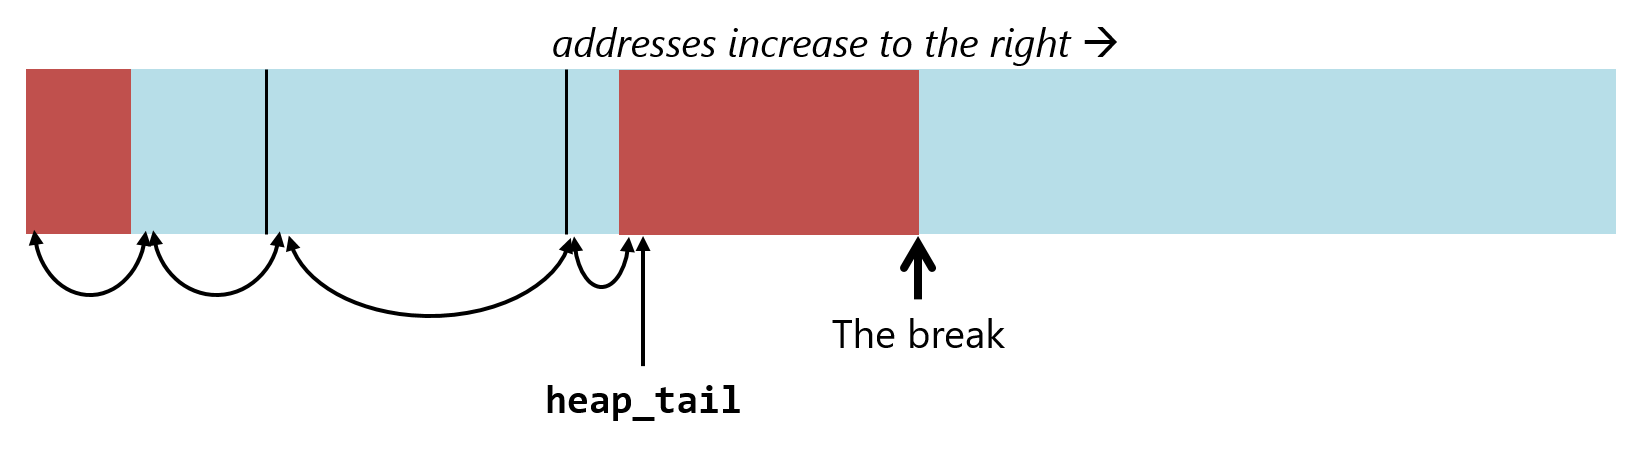
Here is a visual example of how the physical linked list might look with 6 blocks. Red blocks are allocated, and blue blocks are free. The arrows are the links between the blocks:
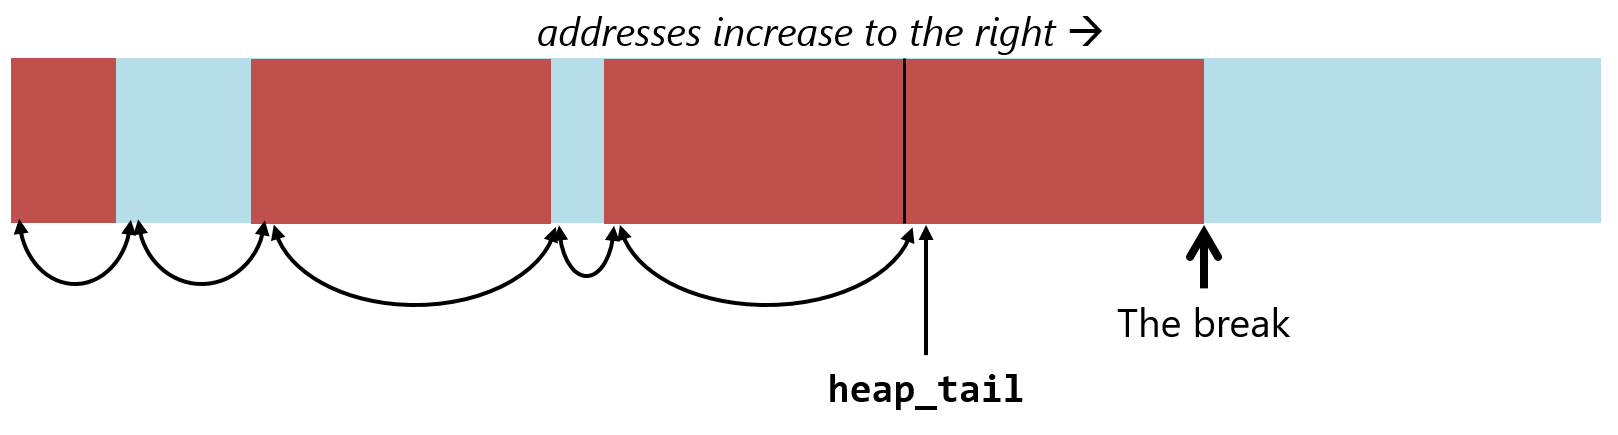
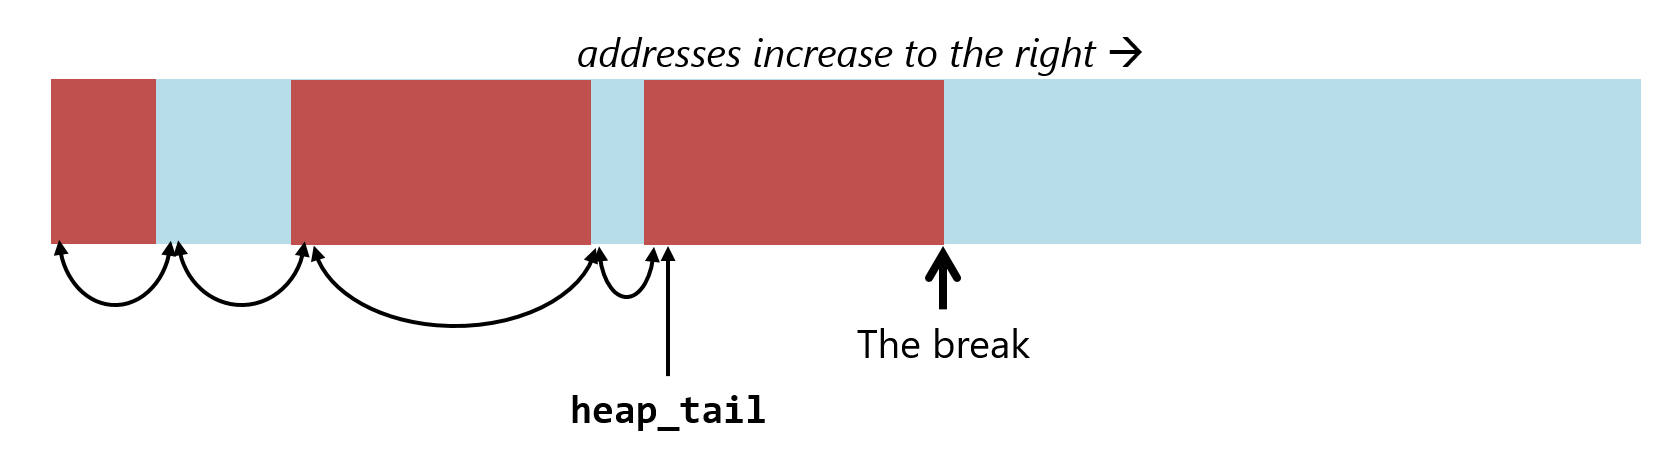
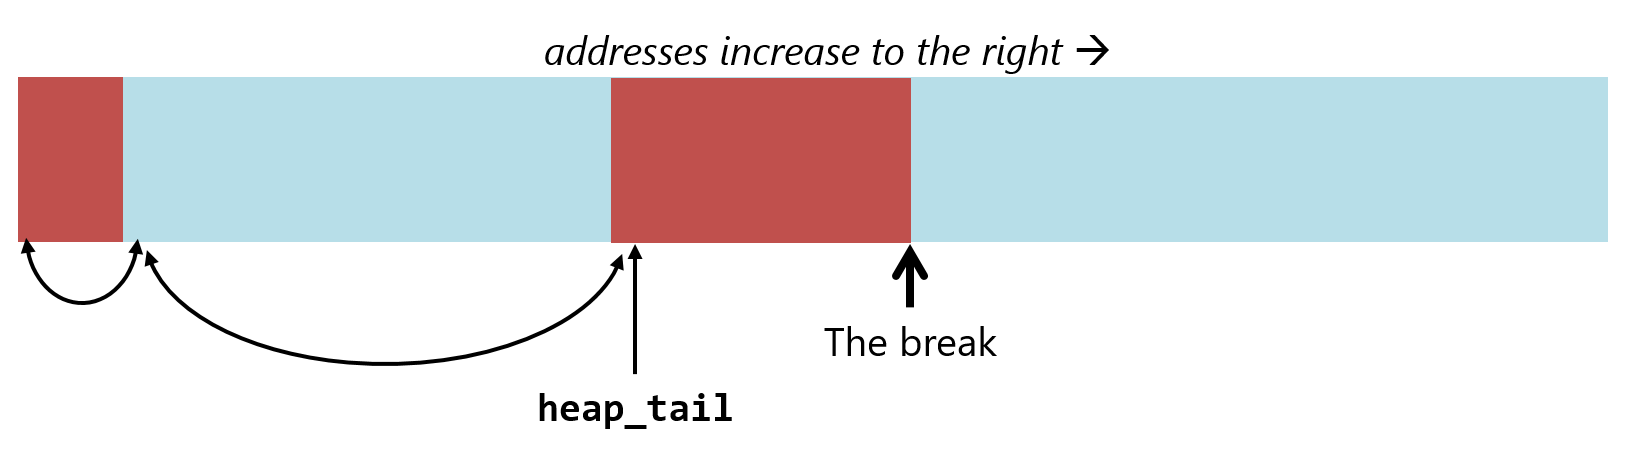
Notice that the break is after the tail block. This will make it easy to know when to contract the heap: when you free a block, if it’s the tail (like this):
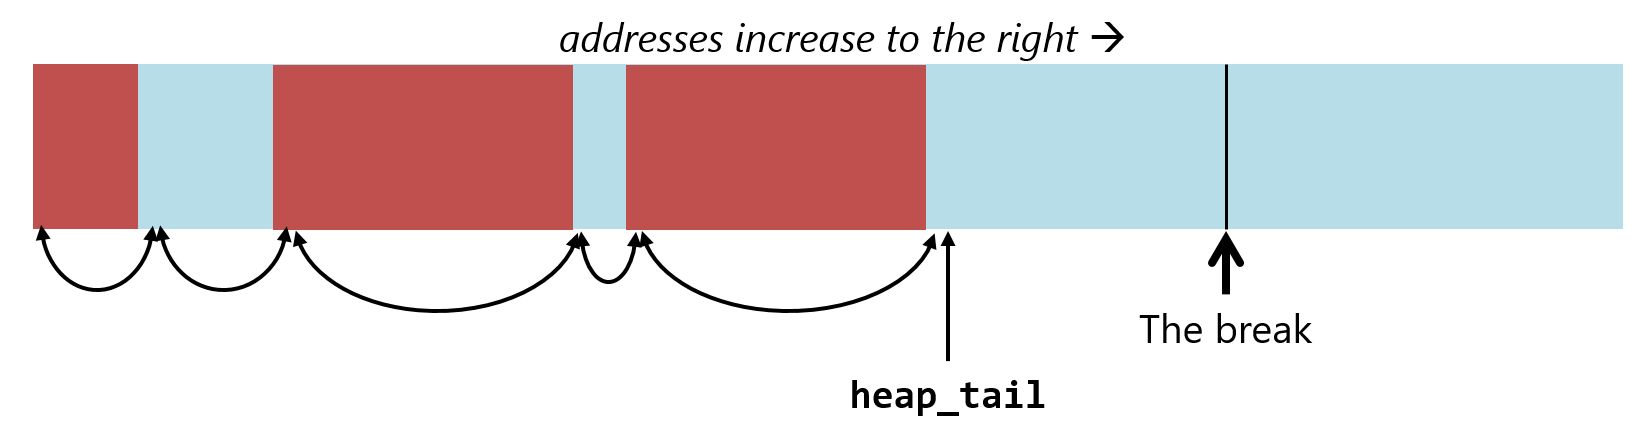
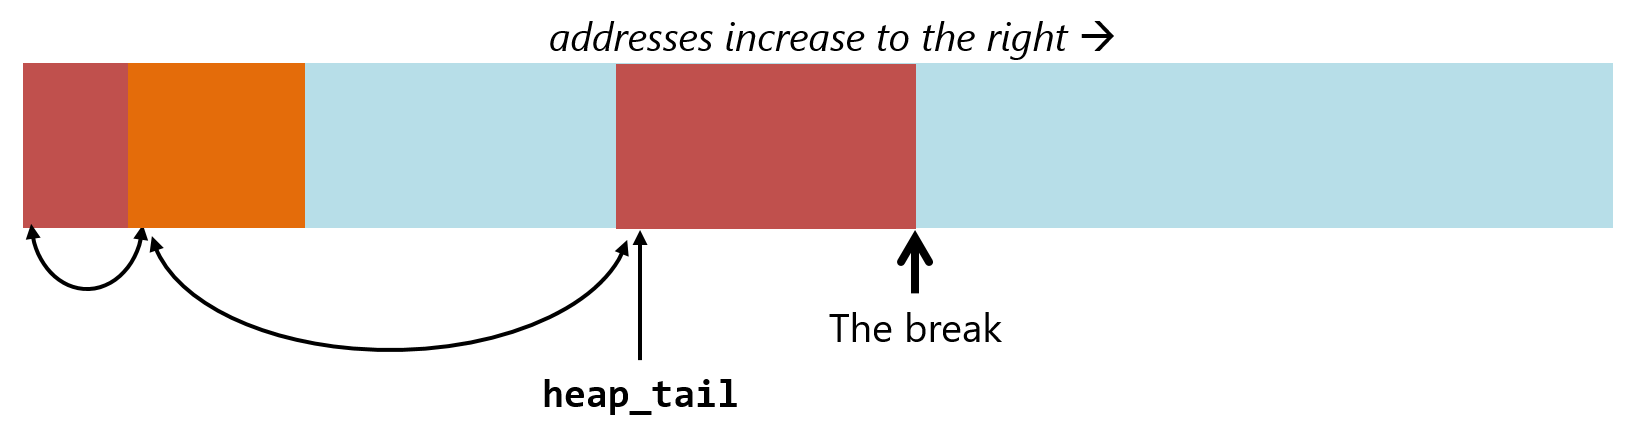
Then you need to unlink it from the list (which will move heap_tail to the previous block), and then move the break down with either brk() or sbrk():
Block? Header? Data size? Block size? Nodes?
It’s important to keep terminology straight when working on this project, or you will very quickly get overwhelmed and confused by mixing up units.
First is a block, which is one piece of the heap. It has a header and some data.
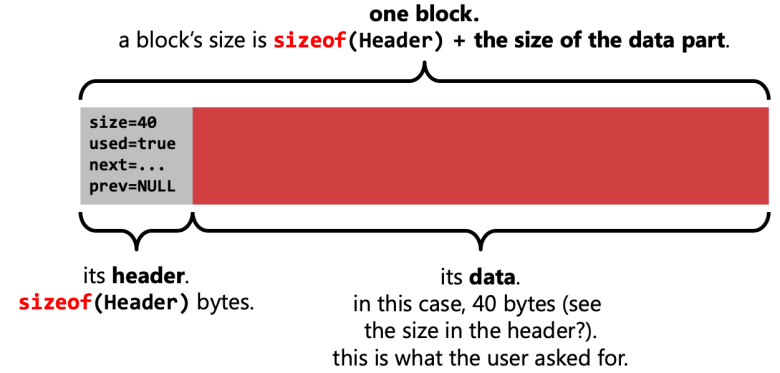
It’s important to distinguish between the data size, which is what the user asks for when they call my_malloc, and the block size, which is that size plus the extra space needed for the header. As the allocator, it is your responsibility to make sure that you make enough space for the headers at the beginnings of blocks.
Each block is also a node in the doubly-linked list of the heap. That’s what the next and prev members of Header are for. “Node” is kind of an abstract term for “thing on a list.” It doesn’t really matter whether you think of the headers being the nodes, or the whole blocks being nodes. What matters is that the blocks are linked together.
Your Task
You will write my_malloc and my_free in mymalloc.c which implement a simple memory allocator using a linked list and a first-fit allocation scheme. The performance won’t be great, but hey, it’s a class project, not a AAA game engine.
Your my_malloc function will:
- Round up the size of the requested allocation to a certain size (I gave you this)
- Try to find a block to reuse, using the first-fit algorithm
- If it found a block to reuse,
- Split that block if possible (there are cases where it isn’t!)
- Otherwise,
- Create a brand new block by expanding the heap (“moving the break up”) and appending it to the end of the list
- In either case, mark the block as used
- Return the pointer to the data part of the block (after the header)
Your my_free function will:
- Figure out the pointer to the header (since it is passed the pointer to the data part)
- Mark the block as free
- Coalesce it with any neighboring free blocks on either side
- If the heap tail is free,
- Unlink it from the list and contract the heap (“move the break down”)
1. First steps (./driver 1)
You are going to be building up my_malloc and my_free gradually. No one writes a program in a single try. Do NOT try to write the entire allocator without compiling, and then compile it and get a million errors and fix them and run it and it crashes and aaaaahhhh oh my godddddd
Look at the first test, test_writing, in driver.c. This test is extremely simple: it allocates two things, then frees them in the opposite order of allocating. Most of the tests use make_array to allocate memory, which allocates an array of ints using my_malloc and fills that array with values.
The tests also make generous use of my_dump(), a function I gave you in mymalloc.c which dumps the current state of the heap to stdout along with a message. This is your main way of telling if things are working.
If you completed lab 5 successfully, you will be able to some of that code (with some modifications) for manipulating the doubly linked list pointed to by heap_head and heap_tail. If you weren’t able to complete lab 5, now is a great time to get help on it.
Important: you will not be able to just copy and paste your lab 5 code into the project and expect it to work. Here’s what you can basically copy-and-paste:
node_linknode_unlink_and_free, except:- change it to
node_unlink - remove the
node_change_weightandfreecalls in it
- change it to
node_coalesce_with_neighbors, once you get to coalescing- though the implementation of
node_coalesce_with_nextwill have to be changed…
- though the implementation of
So here are the parts that you need to get working to get the first test to pass:
- the part of
my_mallocthat expands the heap to create a new block- remember, you need to make an entire block, not just what the user asked for
- do not write the details inside
my_malloc. make a function likeexpand_heapthat takes the requested size, makes a block of that size, fills in the header fields appropriately, and returns the pointer to the header.- remember, do NOT call
mallocandfreeanywhere! for this project, you aremallocandfree
- remember, do NOT call
- and in
expand_heap, do not put linked list bullshit in there. you have your functions from lab 5 for dealing with linked lists. use them. link it to the tail of the linked list. your function already handles that case. - I know it maybe seems silly to have three functions involved in this one task (
my_malloc,expand_heap, andnode_linkor whatever you call it), but trust me, it is way easier to read and write code that uses functions than writing all the details everywhere you need them.
- the part of
my_mallocthat marks the block as used - the part of
my_mallocthat returns the pointer to the data part of the block- if you have a
Header* block, then returningblock + 1does what you want. (Pointer arithmetic calculate the address after the header. It automatically “scales” the 1 by the size of the header.)
- if you have a
- the part of
my_freethat turns the pointer back into a header pointer- just like you added 1 to return it from
my_malloc, you will castptrto aHeader*and then subtract 1
- just like you added 1 to return it from
- the part of
my_freethat marks the block as free - the part of
my_freethat checks if the block is the tail, and if so, unlinks it and moves the break back down- gee, sure seems like you should have a function to do this.
- which calls your
node_unlinkfunction or whatever.
Done correctly, this is what test 1 should output:
-----------------------------------------------------------------------------
Running test_writing...

If this crashes, make sure my_malloc returns a pointer to
the data part of the block, NOT the header. my_free also
has to handle that by moving the pointer backwards.
    should be empty:
        <empty>
    should have one used 40B block:
        [U 40]
    should have two used 40B blocks:
        [U 40][U 40]

Both arrays should contain the values 1 through 10:
a[0] = 1, b[0] = 1
a[1] = 2, b[1] = 2
a[2] = 3, b[2] = 3
a[3] = 4, b[3] = 4
a[4] = 5, b[4] = 5
a[5] = 6, b[5] = 6
a[6] = 7, b[6] = 7
a[7] = 8, b[7] = 8
a[8] = 9, b[8] = 9
a[9] = 10, b[9] = 10

    should have one used 40B block:
        [U 40]
    should be empty:
        <empty>

After test_writing, the break is back where it started!
2. Reusing blocks (./driver 2)
Right now, your allocator is pretty dumb. It doesn’t reuse free blocks. Instead, it moves the break up on every allocation. Let’s fix that.
Implement the part of my_malloc that tries to find a block to reuse, and only moves the break up if that failed. Seems like you should make a function that searches for a reusable block of the requested size, and returns NULL if it couldn’t find one!
As for implementing that function, first-fit is dead simple. All you have to do is iterate over the entire linked list starting at heap_head, and return the first block that is:
- free (not used), AND
- its size is >= the requested size.
Note that C for loops fit with linked lists very well…
for(Header* n = heap_head; n != NULL; n = n->next) {

}
Once you get this implemented right, ./driver 2 will output this (look closely at what the messages say!):
-----------------------------------------------------------------------------
Running test_reuse...

    should have 2 used 80B blocks:
        [U 80][U 80]
    first 80B block should now be free:
        [F 80][U 80]
    first block should be used and STILL 80B, NOT 76!:
        [U 80][U 80]
    should have one free 80B and one used 80B:
        [F 80][U 80]
    should have two used 80B:
        [U 80][U 80]
    should have one used 80B:
        [U 80]
    should be empty:
        <empty>

After test_reuse, the break is back where it started!
A really common mistake at this stage which often causes segfaults: do not move the break down every time the user calls my_free. Only move the break down if, after marking the block free, the heap_tail is free. Then you can unlink the tail and move the break down.
Another really common mistake at this stage which often causes segfaults: do not move the break every time the user calls my_malloc. Only move the break if you couldn’t find a block to reuse; in that case, you have to move the break up and append a new block to the end of the list.
3. Making sure first-fit really works (./driver 3)
Test 3 tests the first-fit algorithm a little more rigorously. There’s nothing more you should have to write for this, just run ./driver 3, and if everything is working, you should see:
-----------------------------------------------------------------------------
Running test_first_fit...

    should have 3 free blocks of increasing size separated by 16B used blocks:
        [F 40][U 16][F 80][U 16][F 120][U 16]
    the 120B block was correctly reused, so now it should be marked used:
        [F 40][U 16][F 80][U 16][U 120][U 16]
    the 40B block was correctly reused, so now it should be marked used:
        [U 40][U 16][F 80][U 16][U 120][U 16]
    the 80B block was correctly reused, so now it should be marked used:
        [U 40][U 16][U 80][U 16][U 120][U 16]
    should be empty:
        <empty>

After test_first_fit, the break is back where it started!
You’re halfway there. Assuming you have good code style, you have a 50%.
4. Splitting blocks (./driver 4)
Now we’re getting fancier. Your algorithm to find a reusable block just finds one that is big enough for the allocation, but sometimes that block is way too big for what the user asked for. Let’s say your heap looks like this:
but the user only wants a little block:
Now we have to split the original large block into two smaller blocks: one big enough to hold the requested block, and one smaller empty block, like so:
Undersized blocks
There is an additional complication: you can’t split every free block. Consider this case:
- the free block’s data size is 64 bytes
- the user wants 32 bytes
sizeof(Header)is 32 bytes
In that case, there wouldn’t be enough space for a new block, because the 32 bytes that the user wants and the 32 bytes for the new header leave 0 bytes of space after the new header!
Therefore, you need to do some calculations before splitting the block. Draw it out. Remember, you need space for the new header and a minimum number of bytes for the data. The MINIMUM_ALLOCATION and/or MIN_BLOCK_SIZE constants at the top of mymalloc.c will be useful here.
You have to be careful about using subtraction here. Header’s size field is a size_t which is an unsigned integer type. Unsigned integers cannot represent negative numbers. Therefore, don’t do any math that might give you a negative number, or check if something is < 0 - it’ll never be! Instead, use your algebra skills to turn that subtraction into an addition on the other side of the comparison.
If you determine that splitting would leave an undersize block, don’t split, but also don’t change the size of the block in the header. Remember, you’re allowed to give the user more space than they asked for. If they asked for 56 and you give them 64, they won’t know the difference. This does cause a small amount of internal fragmentation though!
Notes:
- We talked about this in the memory deallocation lecture. Go look at the slides.
- The
PTR_ADD_BYTESmacro will be very useful here.PTR_ADD_BYTES(p, n)starts at addresspand computes a new addressnbytes after it.- This avoids undesired offset scaling, since
pis likely going to be aHeader*.
Implemented correctly, ./driver 4 will output this:
-----------------------------------------------------------------------------
Running test_splitting...

    should have free 256B block at start:
        [F 256][U 16]
    first block should now be used and still 256B:
        [U 256][U 16]
    first block should be free again, and still 256B:
        [F 256][U 16]
    should have a free 208B block after first one:
        [U 16][F 208][U 16]
    should have a free 160B block after first two:
        [U 16][U 16][F 160][U 16]
    should have a free 112B block after first three:
        [U 16][U 16][U 16][F 112][U 16]
    should have a free 64B block after first four:
        [U 16][U 16][U 16][U 16][F 64][U 16]
    all blocks should be used (should have reused the 64B block):
        [U 16][U 16][U 16][U 16][U 64][U 16]
    should be empty:
        <empty>

After test_splitting, the break is back where it started!
5. Coalescing blocks (./driver 5)
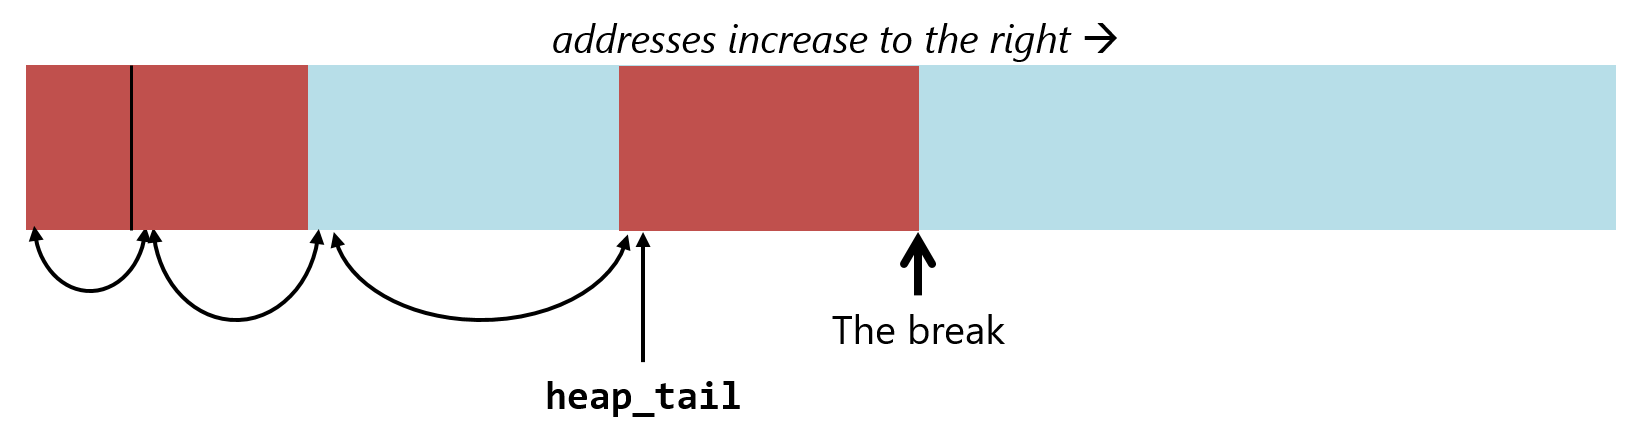
When the user frees a block, you might end up with multiple free blocks in a row, like these three here:
This is a waste, because what if the user wanted an allocation the size of those three put together? Then our algorithm would skip them and move the break.
So there is a simple rule to follow: whenever you free a block, look at the previous and next blocks, and if either one or both are free, combine the free blocks into one larger free block.
Note: you don’t have to look further than one block away! If you follow this rule on every deallocation, it will be impossible to have e.g. 4 or 5 free blocks in a row.
Once coalesced, the three free blocks in the above diagram would become a single large block, like so:
Notes:
- We talked about this in the memory deallocation lecture, too.
- You might free the first or last block on the heap, so there might not be a previous/next block at all.
- You might have zero free neighbors, one free neighbor, or two free neighbors. You have to handle all possible cases.
- But remember, like I said in class, that “two free neighbors” case can be handled as the “one free neighbor” case, twice. (Gee, it’s almost like I had you do this on lab 5 for a reason!)
- The coalescing should be done before deciding whether or not to contract the heap.
- If you are adapting your lab 5 code, be careful: in addition to just checking if the neighbor is non-null, you also have to check if it’s free.
- in other words, only coalesce with free blocks! never with used ones!
This is a big test. It has to test lots of possibilities. Read the output carefully if your test fails, to know approximately where to look in your code to solve the problem. Here is what it outputs on success:
-----------------------------------------------------------------------------
Running test_coalescing...

    should have 5 used 40B blocks:
        [U 40][U 40][U 40][U 40][U 40]

about to test freeing head of heap (no coalescing)
    freed the first block; should have one free 40B block:
        [F 40][U 40][U 40][U 40][U 40]

about to test coalescing with previous neighbor by freeing 2nd block
    freed the second block; should have one free 112B block:
        [F 112][U 40][U 40][U 40]
    freed the second block; should have one free 184B block:
        [F 184][U 40][U 40]
    freed the second block; should have one free 256B block:
        [F 256][U 40]
    reused that block, so should have two used blocks:
        [U 256][U 40]
    should have one used 256B block:
        [U 256]
    should be empty:
        <empty>
    reallocated stuff. should have 5 used blocks:
        [U 40][U 40][U 40][U 40][U 40]

neither of these frees will coalesce:
    second block should now be free:
        [U 40][F 40][U 40][U 40][U 40]
    fourth block should now be free:
        [U 40][F 40][U 40][F 40][U 40]

about to test coalescing with next neighbor by freeing 1st block
    first block should be free 112B:
        [F 112][U 40][F 40][U 40]

about to test coalescing with TWO neighbors by freeing 2nd block
    first block should be free 256B:
        [F 256][U 40]

about to free tail. it should coalesce, then move break down
    should be empty:
        <empty>
    last phase. should have 5 used blocks:
        [U 40][U 40][U 40][U 40][U 40]
    second block should be free:
        [U 40][F 40][U 40][U 40][U 40]
    should have one free 112B block at start:
        [F 112][U 40][U 40][U 40]
    third block should be free:
        [F 112][U 40][F 40][U 40]
    third and fourth blocks should be gone, should have 2 blocks:
        [F 112][U 40]
    should be empty:
        <empty>

After test_coalescing, the break is back where it started!
6. Is it stable? (./driver 6)
You’re probably done? But just to be sure, test 6 is THE BIG ONE. Well, it does a bunch of allocations and frees in an unpredictable fashion. But it should be a good stress test for your allocator.
It doesn’t output much. It should take about a half second to run on thoth. If it’s running for several seconds/minutes, your allocator might be stuck in a loop somehow. This is the output:
-----------------------------------------------------------------------------
Running THE BIG ONE...


After THE BIG ONE, the break is back where it started!
If it works, you’re done!
Submission
The autograder will open up about a week after the project is released. Just like on project 1, it will have a rate limit. However, the autograder is just going to run the same tests on your code that make testall does, so using the autograder isn’t going to give you more insight into the problems with your code than just running them yourself.
It’s an auto-grader, not an auto-TA. Get help from a human.