For this project, you will be making a small command-line image editing tool. It will be capable of reading and writing some BMP image files, an uncompressed image format that’s easy to read and create. It will be able to:
- show some information about a BMP image file
- produce an inverted-color version of an image
- produce a grayscale version of an image
- produce a horizontally-flipped (from left to right) version of an image
Please note: I have every past submission for this project. I will know if you turn in someone else’s code.
But as I said at the beginning of the term, if you took this class with me before, and you have your old code, I don’t really mind if you reuse it. But maybe make it even better this time? ;o
Grading Rubric
The indented bullet points are subcategories.
- [10 points] Code style
- This means not just neatness (proper indentation, good variable names) but more importantly that you split your code up into functions in a reasonable way. The instructions below talk more about this.
- [40 points]
./proj1 infoworks- [20] it works on well-formed BMP files
- [10] it prints the correct info for all well-formed BMP files
- [10] it prints the info in the format that I want
- [20] it properly diagnoses and reports bad BMP files and non-BMP files
- [10] it checks for bad magic, bad length, bad version, and bad BPP
- [10] it outputs the exact error messages that I want
- [20] it works on well-formed BMP files
- [20 points]
./proj1 invertworks- [10] it creates an output file with an identical header and file size as the input file
- [10] it correctly inverts the pixel values
- [20 points]
./proj1 grayscaleworks - [10 points]
./proj1 hflipworks
0. Starting off
- On thoth, you should really make a directory for this project since it’s going to involve a lot of files. Make a directory like
~/private/cs0449/projects/proj1/andcdinto it. - Like you did on lab 3,
wgetthis file into that directory andunzipit. - Rename
abc123_proj1.cto your username like you’ve been doing on the labs. - Run this:
chmod -w *.bmp- This changes the file modes of all the images (
*.bmp) to make them un-writeable. - This will prevent you from overwriting these files and having to get fresh ones from the zip file. Now, if you accidentally try to open these files for writing,
fopenwill fail.
- This changes the file modes of all the images (
In _proj1.c, there’s already some stuff:
- good old
streq(); - a new and improved
fatal()function which can be called likeprintf(), like:
fatal("it accepts formatting arguments: %d %d %d", x, y, z);
- some
#definemacros that make usingfread/fwriteeasier; - a couple
structs (OpenBMPandPixel); - some empty functions that
maincalls; and - a
mainfunction that dispatches to them based on the command-line arguments.
What is this OpenBMP struct about?
In this project you’ll be using an object-oriented programming style on the OpenBMP struct. Object orientation is a vibe, not a strict set of language features. In C, you can “do” object orientation by:
- making a struct that contains the instance fields
- making “methods” which are functions that take instances of that struct by reference as their first argument
The OpenBMP struct represents an… open BMP file. Or two, if there is an input file and an output file. In my implementation, I have the following “methods” for it (notice the first argument on all of them is the same - an OpenBMP* which acts like this in Java):
void bmp_open(OpenBMP* bmp, const char* in_filename)- “constructor” - opens
in_filenamefor input, checks it for validity, and fills in most of the fields ofbmp
- “constructor” - opens
void bmp_open_output(OpenBMP* bmp, const char* in_filename, const char* out_prefix)- called on an
OpenBMPthat was already opened withbmp_open, opens a new file for output based on the input filename and a prefix
- called on an
void bmp_skip_padding(OpenBMP* bmp)- skips forward in the input file by
bmp->paddingbytes (and if there is an output file open, also skips that forward the same amount)
- skips forward in the input file by
void bmp_close(OpenBMP* bmp)- closes any open files in
bmpand sets thoseFILE*fields toNULL
- closes any open files in
Structuring your program
This is a somewhat sizeable program. My implementation is ~330 lines, about 210 lines longer than what you’re starting with in _proj1.c.
In this program there are many common, repeated operations that you will need in multiple functions. You need to structure your program properly. You need to break things up into functions instead of doing everything in the print_info, invert_image etc. functions!
You are graded on doing this. We are not expecting you to get it perfect, but you do have to make an effort. If you just copy and paste the same code four times into the four top-level functions, you will get 0 for that category, and you will be making programming much harder on yourself.
I’ve already given you some information about the OpenBMP methods above. It would probably be a very good idea for you to follow my lead on those. You don’t have to break those up any further, but you could if they get too big for your liking. But please try to work on these habits:
- writing high-level code first and implementing the functions that it calls second
- factoring out operations common to multiple functions into their own functions
- factoring out long or visually complex code into its own function to keep the original function easier to read
- sometimes you will have a function that is called exactly once in one place. that’s fine! as long as it makes the caller easier to read, that’s a win.
Code is primarily for humans to read,
and only secondarily for computers to execute!
Write code for you, not the computer!
Compiling
Use this line to compile your project:
gcc -Wall -Werror --std=c99 -g -o proj1 abc123_proj1.c -lm
The -g includes debug info so it’ll be easier to use gdb when your program breaks, and the -lm at the end links in the math library, needed for the pow() function later in the assignment. (We’ll talk about linking eventually.)
Also try this on thoth: use the file command on the .bmp files, like
$ file noodle.bmp
and see what it prints. file is a really useful command that looks much deeper than the file extension by looking at the file contents to figure out what kind of file something is. It recognizes lots of different file types, and can even display some simple info about common ones. Try it out on other files like your proj1 executable too!
1. ./proj1 info
The first thing you’ll implement is print_info. This command will check that a given file really is a valid BMP file, and then prints out some basic information (which will help you check that you did things right!).
The BMP file format
BMP (short for “bitmap”) was created by Microsoft for Windows 2.0 in 1987 to hold bitmap images. It has been extended over the years with more and more features, but there is a version that is extremely common that was introduced in Windows 3.1 that we will be dealing with.
No matter what version of BMP you look at, they have the same basic structure (numbers are byte positions):

The BMP Header is 14 bytes long and identifies this file as a BMP. It only has a few useful values in it.
The DIB (“device-independent bitmap”) Header is 40 bytes long in the version we’re using. It contains all the information about the image itself - its dimensions, color depth, and so on.
“The primary colors are red, YELLOW, and blue!” For paint, yes, because it is subtractive color; it absorbs light. Screens use additive color because they produce light. The additive primaries are red, green, and blue.
The Pixel Data is variable length and is the data for the pixels themselves. Pixels are the little colored squares that every image is made of. Each pixel has three color components: red, green, and blue. Varying amounts of these three primary colors gives us the entire color spectrum that our screens can produce.
We’ll come back to the pixel data for the invert command. For now, we’ll focus on the two header sections.
The print_info function
print_info is called by main with the filename to open as its argument. Here is how you will write print_info (yes I am giving you the code, it’s only a few lines but this is a Learning Moment):
OpenBMP bmp = {};
the = {} is technically a gcc feature but it’ll be part of C23
This creates an OpenBMP struct variable, and importantly initializes its fields to 0/NULL. That’s what the = {} does. Remember that if you don’t initialize a variable, it will contain garbage.
bmp_open(&bmp, in_filename);
Here we are calling a function that doesn’t exist yet. That’s fine! We are starting high level, and will implement the lower level functions after this one. We’re just trying to get our thoughts down in code at this point. This says, “open the BMP file from in_filename using bmp as the object.”
We don’t have to worry about details right now, so let’s just assume that bmp_open succeeded and that bmp has been filled in with information about the BMP file.
Please copy and paste the following code exactly because the autograder will want the info in this format:
printf("Size: %d x %d\n", bmp.width, bmp.height);
printf("Padding between rows: %d\n", bmp.padding);
printf("Pixel data start offset: %d\n", bmp.pixelStart);
We print out the fields of the bmp struct. This will help you ensure that your bmp_open function is working correctly.
Finally,
bmp_close(&bmp);
We close the BMP file.
Okay. Read the code. Isn’t it nice? It says exactly what it does. There’s no confusing long-winded code, there’s no weird math or array indexing or anything, there’s no error handling, it just reads like English. Open the BMP, print some info, close the BMP. This level of readability is what all true programmers strive for.
The bmp_close function (super easy)
Earlier I gave you the signature for bmp_close. Use that signature to write your own bmp_close function. Don’t just throw it anywhere you want in the file. Part of good code style is keeping related code next to each other - so go put it with the OpenBMP struct. (That’s why I have those big // ------ lines to separate parts of the file.)
Here’s what bmp_close does:
- if
bmp->inis notNULL,fcloseit and set it toNULL. - do the same thing with
bmp->out.
That’s it. Easy! (Setting bmp->in and bmp->out to NULL is not strictly necessary but it’s good insurance so someone doesn’t accidentally use an OpenBMP after calling bmp_close on it.)
The bmp_open function (considerably harder)
Here’s the first real meaty function. bmp_open has to open the file, check that it’s a valid BMP file, and fill in most of the fields of the bmp structure.
First is the BMP header, which looks like this:
| File Offset | Byte Length | C type | Description |
|---|---|---|---|
| 0 | 2 | char[2] |
“Magic Number” (format identifier) |
| 2 | 4 | uint32_t |
Size of the file in bytes - should match real size |
| 6 | 2 | uint16_t |
A reserved value (“reserved” means “not used”) |
| 8 | 2 | uint16_t |
Another reserved value |
| 10 | 4 | uint32_t |
Offset from beginning of file to start of the pixel data |
uint32_t and uint16_t are types that come from stdint.h - they are unsigned 32-bit and 16-bit ints. This avoids the weirdness about the size of C’s short vs int, which can vary from platform to platform.
So here’s what bmp_open should do:
- Open
in_filenamefor reading binary, and assign the result offopenintobmp->in - If
bmp->inisNULLthenfopenfailed so give this error:fatal("could not open %s for reading.", in_filename);- Please use the exact error messages I give you! It will make making the autograder so much easier!
- Read the “magic number.” This is 2
chars that identify this as a BMP file. You can do it like this:char magic[2] = ""; CHECKED_FREAD(bmp->in, &magic, in_filename);Notice I initialized
magicso that I know it’s full of'\0', and I usedCHECKED_FREADinstead offread.CHECKED_FREADis a little easier to use, and it will also give an error message iffreadfailed to read anything. - If
magicis notBM(you can’t usestreqfor this because it’s not a zero-terminated string):fatal("%s does not appear to be a valid BMP file (bad magic).", in_filename);
- Check the length of the file:
- Create a
uint32_tandCHECKED_FREADit in. - Using the technique showed on the file slides, get the actual length of the file with
fseek/ftell. - Compare the length given in the header with the length that you found. If they’re not equal,
fatal("%s does not appear to be a valid BMP file (bad length).", in_filename);
- Create a
- Seek to offset 10 and then read
bmp->pixelStart. (We don’t care about the reserved values.)
Okay, that’s the BMP header out of the way. Then comes the DIB header, which looks like this (we won’t be looking at most of these fields, so don’t worry about what they all mean:)
| File Offset | Byte Length | C type | Description |
|---|---|---|---|
| 14 | 4 | uint32_t |
Size of this DIB header in bytes |
| 18 | 4 | uint32_t |
Width of the image in pixels |
| 22 | 4 | uint32_t |
Height of the image in pixels |
| 26 | 2 | uint16_t |
Number of color planes |
| 28 | 2 | uint16_t |
Number of bits per pixel |
| 30 | 4 | uint32_t |
Compression scheme used |
| 34 | 4 | uint32_t |
Image size in bytes |
| 38 | 4 | uint32_t |
Horizontal resolution |
| 42 | 4 | uint32_t |
Vertical resolution |
| 46 | 4 | uint32_t |
Number of colors in the palette |
| 50 | 4 | uint32_t |
Number of important colors |
So let’s continue writing open_bmp (bmp->in’s position currently at the start of the DIB header):
- Read the DIB header size. If it’s not 40,
fatal("%s is an unsupported version of BMP.", in_filename);
- Read
bmp->widthand thenbmp->height. - Set
bmp->paddingtobmp->width % 4. - Seek to offset 28, and read in the bits per pixel (careful which type you use for this variable!). If it’s not 24,
fatal("%s is %dbpp which is unsupported.", in_filename, bpp);
- Seek to
bmp->pixelStart.
And you’re done!!!!!!! Whew. Now to test it. Here is the output of my program on the test images. Yours should match exactly with no crashes, segfaults, etc.
-
First are the valid image files. Pay close attention to the padding on these to make sure you did that calculation right:
  $ ./proj1 info noodle.bmp
  Size: 600 x 600
  Padding between rows: 0
  Pixel data start offset: 54
$ ./proj1 info abstract.bmp Size: 101 x 101 Padding between rows: 1 Pixel data start offset: 54$ ./proj1 info 202px.bmp Size: 202 x 50 Padding between rows: 2 Pixel data start offset: 54$ ./proj1 info 203px.bmp Size: 203 x 50 Padding between rows: 3 Pixel data start offset: 54 -
Next we’ll test invalid files. Make sure the error messages are exactly these:
  $ ./proj1 info proj1
  proj1 does not appear to be a valid BMP file (bad magic).
(Yes, really, run it with itself as the input.
proj1is not a BMP file and your program detects that!)$ ./proj1 info bad_length.bmp bad_length.bmp does not appear to be a valid BMP file (bad length).$ ./proj1 info bad_version.bmp bad_version.bmp is an unsupported version of BMP.$ ./proj1 info bad_8bpp.bmp bad_8bpp.bmp is 8bpp which is unsupported.
Debugging
I mentioned this on lab 3 but just in case you didn’t have to use it and don’t remember it: if you want to debug a program that takes command-line arguments, you have to run gdb like this:
$ gdb --args ./proj1 info abstract.bmp
That is, you add the --args before the program name and arguments.
Now when you run, it will pass those arguments to your program.
2. ./proj1 invert
Once ./proj1 info is working correctly, you now have a solid foundation on which to build the image manipulation commands.
The OpenBMP struct has a second FILE*, out. All the image manipulation commands work like this:
- create a new file for output and put it in
out - copy the headers from
intoout - read and process the pixel data from
inwhile simultaneously writing it toout
The first two bullet points will be handled by bmp_open_output, and the last by invert_image.
Implementing bmp_open_output
This function takes an OpenBMP that was already opened with bmp_open, creates a new file, and copies the header data over, leaving both file positions at their respective pixel data offsets.
So here’s what you have to do:
- Create a
chararray for the output filename that isPATH_BUFFER_SIZElong.- This is a
#defineconstant at the top of the file. I just picked this number for fun. - The length of filenames/file paths varies from system to system and there is no easy way to know the maximum length, so this will be insecure as hell! Whatever.
- This is a
- Set that output filename to the equivalent of the Java
out_prefix + "_" + in_filename.- That is, if the input filename is
noodle.bmpandout_prefixisinv, then the output filename should beinv_noodle.bmp - You could use
strcpy()andstrcat()for this, orsnprintf- a variant ofprintfthat prints into a string instead of to the console.- If you google for
snprintf, the CPlusPlus site is a pretty good reference. It shows what arguments it takes.
- If you google for
- That is, if the input filename is
- Open that filename for binary writing, and assign the result of
fopenintobmp->out - If
bmp->outisNULL,fatal("could not open %s for writing.", out_filename);(or whatever variable name you used for the output filename string)
- Seek
bmp->into the start of the file. - Create a
chararray that isbmp->pixelStartitems long (!, see below) CHECKED_FREADfrombmp->ininto that array…- …then
CHECKED_FWRITEthat array tobmp->out.
Wait, we created an array whose length is a variable? Yes. This is called a variable-length array or VLA. VLAs were introduced in the 1999 C standard (C99). They let you create a local array variable whose size is not known until runtime. There are two important things to know about VLAs:
- You shouldn’t make “big” VLAs, because the stack - which is where local variables are allocated - is a fairly limited size on most systems.
- If you use
sizeof()on a VLA, it actually evaluatessizeof()at RUNTIME. This is the only exception to the rule thatsizeof()is a compile-time operator.- (The compiler creates a hidden size variable and initializes it along with the VLA. Then
sizeof()on a VLA gives you the value of that hidden variable.)
- (The compiler creates a hidden size variable and initializes it along with the VLA. Then
Starting invert_image and testing bmp_open_output
Now in invert_image, just like in print_info you need to:
- Create an
OpenBMPvariable bmp_openitbmp_closeit
But this time, after bmp_opening it, call bmp_open_output on it with "inv" as the last argument.
Now to test that bmp_open_output is working right:
- compile, and run
./proj1 invert noodle.bmp ls -l, and you should have a file namedinv_noodle.bmpthat is 54 bytescmp -n 54 noodle.bmp inv_noodle.bmpwill compare the first 54 bytes of the two files. If it prints nothing at all, they are identical and you did it right.- It’ll look like:
 $ cmp -n 54 filename.bmp inv_filename.bmp
 $
No output at all. No news is good news.
- It’ll look like:
The pixel data and row padding
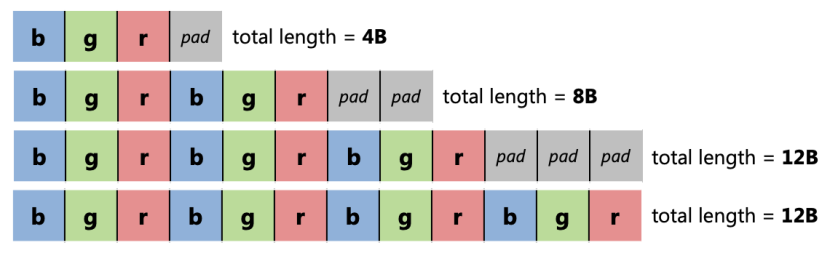
The pixel data is mostly straightforward. We are working with 24-bit-per-pixel BMP images. 24 bits == 3 Bytes. That means for each pixel, each color component is a value between 0 (that color is fully off) and 255 (that color is fully on). E.g. (0, 0, 0) is black and (255, 255, 255) is white.
The pixel data itself is stored row-by-row, weirdly enough bottom-to-top (I’m sure there’s some historical reason for that). But there is one major quirk with the rows: the BMP format requires that the data for each row of pixels must be a multiple of 4 bytes.
Since each pixel is 3 bytes, 3 × width is not guaranteed to be a multiple of 4. In that case, extra empty padding bytes are used to make the row a multiple of 4 bytes. This is what you computed in bmp_open for bmp->padding - the number of extra bytes that will appear at the end of each row.
Below are examples of the data for one row of pixels (shown as arrays of bytes) for images of 1, 2, 3, and 4 pixels wide. The “total length” of each row is always a multiple of 4.
So here is what invert_image will do:
- After opening the output file, make a nested loop: the outer loop loops over rows of the image (so
bmp.height), and the inner loop loops over columns of pixels (sobmp.width). - For each pixel (inside the inner loop):
- Make a
Pixelvariable CHECKED_FREADit frombmp->in(see below)- “Invert” it (see below)
- then
CHECKED_FWRITEit out tobmp->out, using the string"output"as the last argument.
- Make a
- After each row, if
bmp->paddingis not 0:- seek
bmp->inahead bybmp->padding; and then - write
bmp->paddingbytes of zeros tobmp->out(see below) - (My
bmp_skip_paddingmethod does both of these things. You’ll need to do this in multiple functions, so make this method too!)
- seek
Using fread/fwrite on structs is normally not okay. But since Pixel is made of uint8_t - single bytes - it is guaranteed to not have any padding or alignment holes, so it’s safe here. (C is full of this kind of thing you should Never Ever Do (except it’s okay to do it in this one case!). but we say “you should Never Ever Do It” because it’s easier than explaining all the little exceptions to the rules.)
For the padding: read the instructions carefully. e.g. if bmp->padding is 3, you would write 3 bytes with the value 0. You do not write bmp->padding to the file.
Inverting a pixel means setting each component to the bitwise complement of its value. That is, p.x = ~p.x and so on. Hmm. Maybe you should make a method for this? pixel_invert or something? (And if you do, should it take the Pixel by value or by reference?)
Testing it
First, run the program like:
$ ./proj1 invert noodle.bmp
$
It should print nothing, and not crash or anything. But ls -l should show:
- it has created
inv_noodle.bmp - importantly, the sizes of
noodle.bmpandinv_noodle.bmpshould be identical: both 1080054.
Use your own program to test the validity of the output file:
$ ./proj1 info inv_noodle.bmp
Size: 600 x 600
Padding between rows: 0
Pixel data start offset: 54
$
Finally, use your SFTP client to download and visually inspect the input and output images. (If you already had it open, you may have to refresh its view to see the newly created image.) This is what you should see:
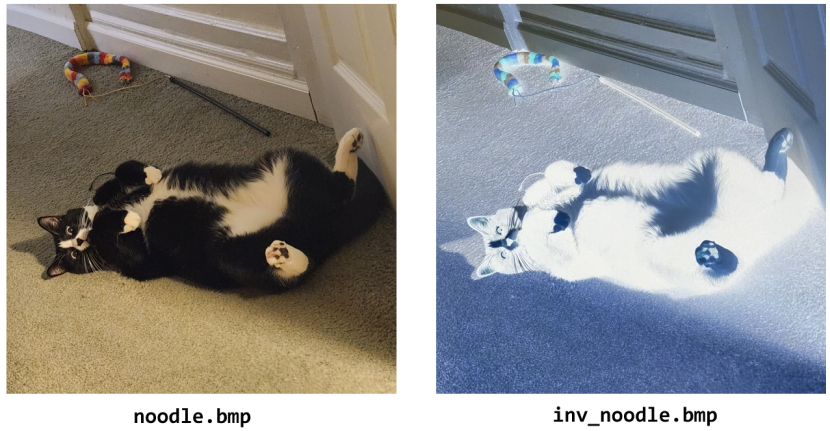
This is one of my cats, Noodle, with his favorite toy and friend, Worm on a Stick.
Try inverting the other good images (abstract.bmp, 202px.bmp, and 203px.bmp). The properly-inverted versions are shown below.

3. ./proj1 grayscale
Now that you have a bunch of functions created, the project starts to get easier, because you can reuse them!
The grayscale_image function converts an image to… well, grayscale. There’s a lot of color theory and perceptual.. biological… blah blah blah it’s a whole bunch of math, but if you can convert the math into code, it’ll work just fine.
This function will look almost exactly like invert_image. The only differences are:
- the prefix passed to
bmp_open_outputis"gray"; and - for each pixel, instead of inverting it, you will convert it to grayscale.
These are the steps to convert a color to grayscale (details follow):
- Normalize the three color components from
[0, 255]to the range[0, 1](as adouble) - Convert each color component from sRGB to linear using some weird math
- Mix the three linear color components into a single linear luminance component
- Convert linear luminance to sRGB luminance
- Denormalize(?) sRGB luminance to the range
[0, 255]and put it into all 3 color components
Yeah, I don’t really understand it either. Just plug and chug. Details on each step (formulas from this Wikipedia article):
- This means you need to divide the red, green, and blue components each by
255.0and put the results intodoublevariables. Name them liker_srgb,g_srgb,b_srgb. - Convert each of those 3 variables to linear values using the formula below, putting the results into 3 new variables.
-
In the formula below, Csrgb stands for any of the 3 color components, and Clinear is the output:
\[C_{linear}= \begin{cases} \frac{C_{srgb}}{12.92}, & \text{if } C_{srgb} \leq 0.04045\\ \left(\frac{C_{srgb} + 0.055}{1.055}\right)^{2.4}, & \text{otherwise} \end{cases}\] - Make a function for this. It saves A LOT of typing cause you have to do this 3 times.
- The
^operator in C does not perform exponentiation, it performs exclusive-OR (XOR).pow()from<math.h>performs exponentiation.- It’s really only calculators that allow
^for exponentiation.
-
- The mixing formula is wonderfully simple:
-
Y is the name for “luminance”. I have no idea Y it’s named that.
\[Y_{linear} = 0.2126R_{linear} + 0.7152G_{linear} + 0.0722B_{linear}\] - The coefficients here are kind of how “bright” we humans perceive each color component. We see greens the best and blues the worst!
- Note: because floating point addition lacks the associative property (!), it’s important that you do the addition in the same order as the formula above: R+G+B. If you swap around the terms of this addition, you can get slightly different results! (I think the autograder does allow for some wiggle room there but still, it’s easiest to just write it in the same order as I wrote above)
-
-
Converting Ylinear back to Ysrgb is the inverse of step 2 (and you should make another function):
\[Y_{srgb}= \begin{cases} 12.92Y_{linear}, & \text{if } Y_{linear} \leq 0.0031308\\ 1.055Y_{linear}^{1/2.4} - 0.055, & \text{otherwise} \end{cases}\]- Important: remember your order of operations… when do you multiply by 1.055?
- This means you multiply Ysrgb by 255 and then cast to
uint8_tand put it back into the pixel’sr,g, andbcomponents.
Whew. That was a lot of math. I was able to do this in about 25 lines over 3 functions.
Don’t forget to use ./proj1 info to test that the gray_whatever.bmp files are valid!
Here’s what the output of ./proj1 grayscale should look like on the 4 test images. If your images look really light/bright/washed-out compared to this, it may be that you mixed together the srgb colors instead of the linear colors. Check your formulas!

Also, here is a zip file of the expected outputs of the grayscale command. You can wget it into your project directory on thoth and unzip it, then compare your outputs to the correct outputs like
cmp gray_noodle.bmp correct_gray_noodle.bmp
If they’re identical, it’ll print nothing; if they’re not, it’ll say which offset is different. If the offset is >= 54, then something is wrong with your formulas.
4. ./proj1 hflip
Last one. This one is actually pretty easy, no scary math. But there’s a complication: in order to flip the image horizontally, we could either:
- seek to the end of of the row of pixels, and seek backwards after reading every pixel; or
- read in a whole line of pixels at once, flip them horizontally in memory, and write out the flipped line all at once.
We’ll be doing the latter. It’s way easier, with one complication: you don’t know how wide the image is until runtime. So you need a VLA again, this time an array of Pixel that is bmp.width items long.
Create this VLA once, before the nested loop in hflip_image. You’ll just reuse the same array for every iteration of the outer loop.
The outer loop will read the entire row of pixels into that VLA. Then, the inner loop will swap the pixels in that row end-for-end (swap the pixel at x with the one at width - 1 - x). But be careful… the upper bound of the inner loop is going to be half the image width. Otherwise it will horizontally flip the pixels twice in one loop, giving the same pixels you started with!
After the inner loop, write the entire row of pixels out to the output, and then skip the padding as usual. That’s it!
I’d really recommend making a pixel_swap function that swaps the values at two Pixel*s. It makes this super simple.
And that’s it. This is what your program should output. Pay close attention to the center of abstract.bmp. I put those thin vertical lines there so you can check if your loop bounds are right. If they’re not right, it’ll look weird in the center!

If your horizontal flip produces output that looks unchanged from the input, make sure your pixel_swap function is written correctly. Do you want to pass the pixels by value or by reference? If you pass by reference, do you want to swap the pointers, or the values at those pointers?
Submission
The autograder will open up about a week before the project is due. This time, the autograder will have a rate limit on it, preventing you from submitting more than once per hour (except when it’s close to the deadline). So be sure to debug your program yourself and get help from the TAs and me instead of running the autograder after every three-character change in your source code!