For this project, you’ll be making a very simple keyboard, in the style of those “kids keyboards” that I’m sure at least some of you had. With it, you will be able to:
- play terrible-sounding notes by clicking a virtual piano keyboard!
- play a demo song! (cause like, they ALL had one)
- record your own song and play it back!
Grading rubric
- [20] Drawing the keyboard
- [20] Clicking on keyboard keys
- [8] for white keys
- [12] for black keys (which are slightly trickier)
- [10] Drawing the buttons and their captions
- [10] Clicking the buttons, even if their functions aren’t implemented
- [20] Playing the demo song
- [20] Recording mode (and playback of recorded song)
Note: if you submit on the late due date, 10 points will be deducted after all other grading has been done.
Also note: if you submit the wrong thing (submit a file that isn’t your project, or an outdated version of your project) and it isn’t found until the grader looks at it, you will be allowed to resubmit, but you will lose 20 points. Be careful about what you are submitting. (But if you make a mistake in what you submit before the deadline, it’s no problem. Just resubmit with the correct file. You have infinite resubmissions before the deadline.)
Code style: although there is no point category for code style, the grader may take off up to 10 points if your code is very poorly-written. Poor indentation may lose you a couple points, but mostly it’s about using the calling convention we learned; using the right registers for the right purposes; and writing/using functions correctly. Remember: keep your code neat and tidy while you write it, not at the end.
Getting started
Download this file and extract it somewhere sensible.
Then rename the abc123_proj1.asm file. Your username is not abc123.
Then you can open it in MARS. By the way, did you know you can drag files from a folder onto the MARS window and it will open them without having to use the File > Open dialog?
Overview:
- The
display_files are the driver for the display plugin.- We’re not using most of it for this project… but you can play around with it on your own time if you’re curious.
macros.asm- some useful macros (likelstrandprint_strbut several others too)proj1_graphics.asm- all the graphics and their palettesproj1_nesfont.asm- a font that is loaded to display text on the screen
and of course, _proj1.asm is the program itself.
What’s all this in _proj1.asm?
First are all the constants you might need.
Then come all the variables and arrays. You’ll probably need most or all of these, but you won’t need to add any more than I already gave you.
main looks similar to what you did on lab 6, no? You won’t need to change it.
load_graphics is filled in for you, you don’t need to change it either.
Most of the rest of the functions are stubbed out, some of them print a message.
Finally the last pre-written function is play_note, though you’ll be adding to it later. It uses syscall 31 to output a MIDI piano note.
Drawing the Keyboard
If you assemble and run the project right now, it should run just fine, and display a green screen. If it doesn’t assemble, please get help.
The first thing you need to do is draw the keyboard onto the screen so the user has something to interact with. You’ll do that in draw_keyboard which is already stubbed out for you.
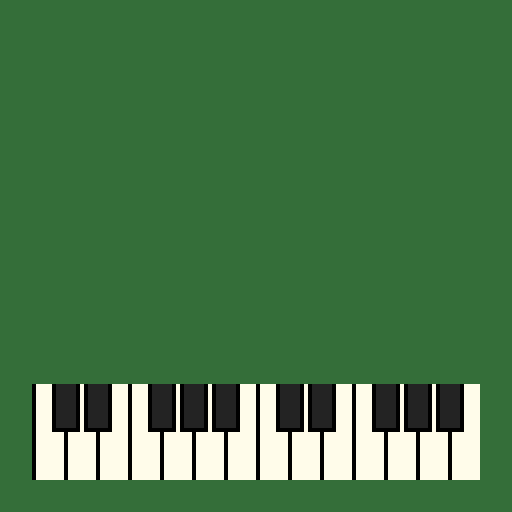
Your goal is pictured to the right, and I’m trusting you to be able to figure out how to draw this. Here is what you need to know:
- The keyboard is drawn on the tilemap just like you learned to use on lab 6.
- The
KEYBOARD_TX/Y/Wconstants at the top of the file will be useful. They specify the position and width of the keyboard, measured in tiles. Specifically,(KEYBOARD_TX, KEYBOARD_TY)is the tile position of the top-left corner of the keyboard; all other tiles will be placed to the right/below them. -
The tiles are laid out like so:
1 2 3 1 2 2 3 1 2 3 1 2 2 3 4 5 6 4 5 5 6 4 5 6 4 5 5 6 7 7 7 7 7 7 7 7 7 7 7 7 7 7 - You’ll notice the
keyboard_top/mid/bot_tilesarrays have these numbers in them. You can use them or not, up to you. You can modify them too if that makes it easier for you. - You don’t have to write your own
place_tilefunction like you did on lab 6. Instead, there is one provided for you:display_set_tile(int tx, int ty, int tile, int flags)a0is the tile xa1is the tile ya2is the tile number - those numbers given abovea3can be set to 0 - it’s used to do Fancy Things we don’t need here.
Basically, I don’t care how you solve this, just that you get the keyboard drawn in the right way in the right place on the screen. I mean, I guess the only thing I care about is that you use a loop to do it, because damn, doing it without a loop would be torture.
Remember: plan it out, think about how you’d do it in Java, then translate that to assembly. Nothing about this is particularly complicated. It only feels complicated if you try to do it entirely in assembly first.
Clicking on the keyboard keys
First, let’s change check_input: add a jal check_keyboard_clicks. Then, stub out a check_keyboard_clicks function under it. (We’re doing this because we’ll be adding more input checking to check_input later.)
In check_keyboard_clicks you can put a _return: label like this:
check_keyboard_clicks:
    push ra

_return: # <------ put this right before the pops!
    pop ra
    jr ra
Now, any time you want to return from this function, you can branch/jump to _return.
What we need to do
This function needs to:
- check if the mouse is onscreen, and return if not.
- check if the mouse is over the keyboard (within its rectangle of pixels), and return if not.
- check if the mouse button is being pressed, and return if not.
- convert the X coordinate into a key number
- get the note for that key number, and play it
Put some comments in your check_keyboard_clicks function to “sketch out” this sequence of steps. Remember, a lot of writing assembly is just discipline. Keeping your thoughts straight will make it much easier.
The display lets you get mouse input in a very simple way:
- The
display_mouse_xvariable is a.wordwhich is either:-1to indicate that the mouse is outside of the display; or- an integer in the range
[0, 127]to indicate the X coordinate of the mouse cursor.
- The
display_mouse_yvariable works the same way.
So, here’s what you need to do:
- checking if the mouse is offscreen
- Basically, if
display_mouse_xis < 0, you can return.
- Basically, if
- checking if the mouse is over the keyboard
- the constants
(KEYBOARD_PX, KEYBOARD_PY)define the top-left pixel coordinate of the keyboard. if the mouse is to the left of, or above, these coordinates, return. - the constants
KEYBOARD_PWandKEYBOARD_PHdefine the pixel width and height of the keyboard. That means the bottom-right corner is at(KEYBOARD_PX + KEYBOARD_PW, KEYBOARD_PY + KEYBOARD_PH). if the mouse is to the right of, or below, these coordinates, return. - (so yeah, there will be 4 branches, one for each side of the rectangle.)
- the constants
- checking if the left mouse button is pressed
- load
display_mouse_pressedas a word. - then
andit withMOUSE_LBUTTON: e.g.and t0, t0, MOUSE_LBUTTON. - if the result of the
andwas 0, return.- just trust me on this.
- load
- convert the mouse X coordinate into a key number
- at this point, we know the user is clicking on a key! we just have to figure out which one
- it’s easy: it’s
(display_mouse_x - KEYBOARD_PX) / KEYBOARD_KEY_PW - you now have a number in the range
[0, 13]
- get the note for that key number, and play it
- the
white_keysarray contains the note numbers for the white keys. - use the key number to index this array (careful! look what type of array it is)
- and pass the value you load from the array to
play_note - i.e. steps 4 and 5 together are:
play_note(white_keys[(display_mouse_x - KEYBOARD_PX) / KEYBOARD_KEY_PW])
- the
Done correctly, you should now be able to click the white keys and hear notes. But there might be some issues with the sound output, so read below as well.
If it’s not working correctly, try adding some debugging prints to see how far into the function you are getting. If you click inside the keyboard, it should absolutely get to “step 4” above, but it should never get there if you click outside. A big part of debugging is about narrowing down where something goes wrong, so don’t be afraid to use the print_str and println_str macros to print out debug messages to help you narrow it down!
A note about the MIDI output in MARS
The first MIDI note played after MARS starts can be delayed by a few seconds. There is nothing that can be done about this. But after that, MIDI notes should start playing immediately.
If MARS has been running for a while, all MIDI notes will be delayed by several seconds. I have no idea why. Just restart MARS. (You don’t need to restart your computer. You never need to do that if a program is misbehaving.)
Handling the black keys
To handle the black keys, we are going to treat the keyboard as two rectangles:
- if the user clicks in the top half, it will play a black key
- if the user clicks in the bottom half, it will play a white key
This isn’t the 100% most perfect and accurate way to do this, but it’s simple and that’s all that matters.
To do this, you’ll have to modify the code you wrote on the last step:
Right after you’ve checked for the mouse click, you need an if-else:
- if the mouse Y coordinate is between
KEYBOARD_PYandKEYBOARD_PY + KEYBOARD_BLACK_PH…- play a black key (see below)
- else
- play a white key (the code you wrote already)
To play a black key:
- first do
display_mouse_x - KEYBOARD_PX - 6- after doing so, it may have become negative… if so, return
- then divide by
KEYBOARD_KEY_PWand indexblack_keys - but you also need to check if the value you loaded from
black_keysis -1- if so, return
- (this is to handle the “gaps” where there are no black keys)
- finally, play the loaded note with
play_note
Now you can test out the black keys - they should make notes that are “in between” the white key notes.
Drawing the buttons
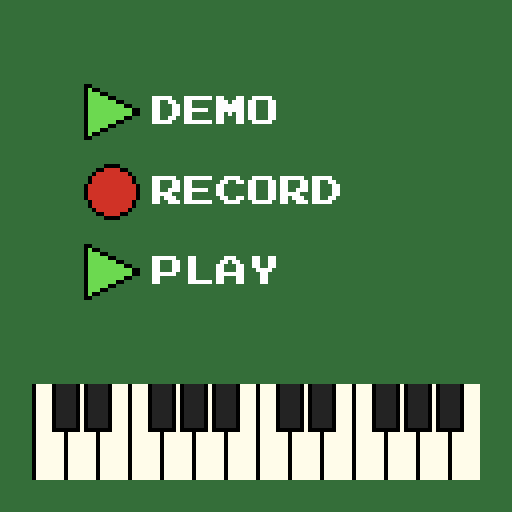
Next you need to draw three buttons, shown to the right.
The data for these buttons is in the button_ arrays:
button_tilesholds the tile numbers that you’ll use to draw the button spritesbutton_xsholds the X coordinatesbutton_ysholds the Y coordinatesbutton_labelsholds pointers to strings which will be shown next to the buttonsbutton_funcsholds pointers to functions which will be called when the button is pressed (!)- we’ll use that in the next part.
Drawing the buttons in draw_buttons is pretty straightforward.
- There is an
N_BUTTONSconstant you can use for theforloop upper bound. - To draw button
i, you need to draw a sprite atbutton_xs[i],button_ys[i], with tilebutton_tiles[i]. There is a function provided for that too:display_draw_sprite(int x, int y, int tile, int flags)- for the
flagsargument, pass0x29
Once you get the button icons showing up, you need to draw the text (you can do that inside the same loop):
display_draw_text_sprites(int x, int y, char* str)draws a string using sprites.- for
x, passbutton_xs[i] + 18 - for
y, passbutton_ys[i] + 4 - for
str, passbutton_labels[i]- yes, really, just use
lwto load the value out of theith item of the array, trust me
- yes, really, just use
- for
Done correctly, your display should match the image above.
Clicking the buttons
Make a new check_button_clicks function, and call it from check_input.
Here’s how this function will work:
- return if the mouse is offscreen (just like before)
- return if the left button is not pressed (just like before)
- for each button,
- check if the mouse is over the button
- its top-left is
button_xs[i], button_ys[i] - its bottom-right is that plus
BUTTON_WandBUTTON_H - if the mouse is not over the button, DO NOT RETURN. if you do, you will exit the loop early, and only check 1 button instead of 3. Instead, you need to structure it as an
ifwithin theforloop:
for(int i = 0; i < N_BUTTONS; i++) { if(mouse is over the button) { // do the next step! } // <------- come HERE if the mouse is NOT over the button // this is the line immediately before the increment of the loop. } - its top-left is
- if the mouse IS over the button:
- load the function from
button_funcs[i]and……….. call it??? - yes.
jalr reglets you call a function whose address is inreg. -
so you’ll do something like:
  lw   t1, button_funcs(t0) # assuming t0 contains multiplied index
  jalr t1                   # calls the function!
- load the function from
- check if the mouse is over the button
If this seems weird, well guess what: this is exactly how method calls in object-oriented languages like Java work. Index a function out of an array and call it. This way, the same call instruction can call many different functions instead of being hard-coded to call just one. Think about it: without this ability, we’d have to have like a big ugly switch-case to decide which function to call based on which button we clicked. Gross!
Done correctly, clicking the buttons should print some messages (since I put some code in press_demo, press_record, and press_play to do that)!
The demo song, and the “song format”
Every toy keyboard needs a cheesy song built in that kids can use to annoy their parents and siblings. I’ve provided one for you. But first, some theory.
The demo song arrays
In the .data segment you’ll find:
    # the demo song as a pair of arrays
    demo_notes: .byte
        64 64 64 64 64 64 64 67 60 62 64
        65 65 65 65 65 64 64 64 64 62 62 64 62 67
        -1

    demo_times: .word
        12 12 24 12 12 24 12 12 18 6 48
        12 12 18 6 12 12 18 6 12 12 12 12 24 24
        0
The song “format” which you will be playing works like this:
- there are two parallel arrays, one for notes and one for times.
demo_notes[i]is the note number to be passed toplay_notedemo_times[i]is how many frames to wait until moving onto the next note.
- the end of the song is indicated by a negative note number (the
-1at the end)- (the corresponding time doesn’t mean anything, it’s just a 0 there as a placeholder)
A frame is about 1/60th of a second, and is 1 time through the loop in main. (This is actually set up by display_init by passing 15 as the “milliseconds per frame” argument. Don’t change it.)
Doing multiple things at the same time
We want to be able to play the keyboard at the same time as the demo plays. This sounds complicated but it’s really not.
You’ve been “doing multiple things at the same time” for the whole project already. On each frame, you do one check for clicking on the keyboard, one check for clicking on each button, etc. The demo playback isn’t going to be any different. On each frame, we check if we need to “move to the next step.” That’s it.
Walking pointers
We are going to be working with arrays whose addresses are held in variables. This is different from accessing them directly, and MIPS has some limitations that makes accessing such arrays a bit clunky. So, we’ll be using a slightly different technique for accessing these arrays, something I like to call a “walking pointer.”
A pointer is variable which contains the memory address of another variable. In our case, the play_note_ptr and play_time_ptr variables will hold the memory addresses of the note and time arrays discussed above… or any other note and time arrays (such as the ones used for recording).
We could do the old A + i * S thing with these pointers, but MIPS makes it awkward, so instead, we will increment their values to move through the arrays. Here is an animation of how “walking pointer” works:
This way, we can iterate over the items of the array without even needing to remember what index we’re on.
Demo playback
In press_demo (already stubbed out for you), you’ll do the following:
- return if
is_recordingis != 0. (this avoids weirdness in the future.) - Load the address of
demo_notesintoa0usingla. - Load the address of
demo_timesintoa1usingla. - Call
start_playback, which we’re about to write
In start_playback (already stubbed out):
- Store
a0intoplay_note_ptranda1intoplay_time_ptr - Load the first note (as a byte) from
(a0)and play it withplay_note - Do
play_last_frame = display_frame_counter- these are both
.wordvariables display_frame_counteris a “magical” variable which increments by 1 every time you calldisplay_finish_frame- it’s how we will keep track of time
- these are both
Finally, in update_playback (already stubbed out) we will write our song-playing code:
- if
play_note_ptris 0 (null!), return. - if “not enough time has elapsed,” return. How you check that:
- first, compute
display_frame_counter - play_last_frame - then, load
play_time_ptrinto a register, let’s sayt0 - then
lw t1, (t0)to load the time out of the array item thatt0is pointing to. - finally, if
display_frame_counter - play_last_frameis less than the time you just loaded, return.
- first, compute
- enough time has elapsed, move to the next note:
play_time_ptr += 4(to “walk” to the next item in the array of words)play_note_ptr += 1(to do the same, but it’s an array of bytes)- load the next note as a byte from the address held in
play_note_ptr. - if it’s negative,
- set both
play_note_ptrandplay_time_ptrto 0 (null). (this will stop playback because of the very first thing we checked in this function)
- set both
- else,
- play that note,
- and set
play_last_frame = display_frame_counter
This is gonna be tricky for sure. But if you get it working correctly, clicking the play button marked “demo” should play a short song for you.
In addition, you should be able to play notes on the keyboard while the demo song is playing!
If everything is working correctly so far, you have an 80%.
Recording songs (and playing back the song you recorded)
Recording uses the following variables
is_recordingis a “boolean” (0 = false, not-0 = true) saying if we’re currently recordingrecording_idxis the current position in the following two arrays, which gets incremented every time we play a noterecorded_notesis the array of notes the user played while recording was on, andrecorded_timesis the array of note times the user played, and it works just like the demo
Here’s the general flow:
- the user presses the record button
- the record button changes to a “stop” button to show that recording is in progress
- the user plays some notes on the keyboard
- the user presses the stop button
- the user can now press the bottom play button to play what they just recorded
What you need to do follows.
press_record
- if
is_recordingis 0,- call
start_recording - change the second item of
button_tilestoBUTTONS_STOP_TILE
- call
- else
- call
stop_recording - change the second item of
button_tilestoBUTTONS_RECORD_TILE
- call
press_play
- if
is_recordingis not 0, return - if the first note in
recorded_notesis < 0, return (avoids playing an empty song) - call
start_playbackwith the addresses ofrecorded_notesandrecorded_times- kinda like you did in
press_demo
- kinda like you did in
play_note needs some code added to it before the lines that do the syscall:
- if
is_recordingis not 0:recorded_notes[recording_idx] = a0recorded_times[recording_idx] = display_frame_counterrecording_idx++
(there is no “else”, the if just ends right before the li a1, NOTE_DURATION line)
start_recording
recording_idx = 0is_recording = 1
stop_recording
is_recording = 0recorded_notes[recording_idx] = -1recorded_times[recording_idx] = display_frame_counter- then finally, you need to convert the absolute times in the array into relative times:
for(i = 0; i < recording_idx; i++)recorded_times[i] = recorded_times[i + 1] - recorded_times[i]
There are many things which could go wrong during this. Remember to try to narrow down where problems are, instead of throwing up your hands in despair.
Done correctly, you should be able to record songs and play them back, as explained before.
Submitting
Upload only your _proj1.asm file to Gradescope once it’s open. There is no way to autograde this, but it will try to assemble it, and remember, never turn in a program that doesn’t assemble/compile.