In this week’s lab, you’ll be making a very simple “game” where you have to “catch an LED” (that is, press a button at a specific time to win). There is a long tradition of making tiny, simple games out of digital logic components, and we’re continuing that tradition!
The goal of this lab is to get some experience with the clock and using a register, including getting a feel for “when” the register’s value is updated, how to prevent the register from changing, and using the output of the register to make something happen over time.
This is a finite state machine, and it will have some of the “intelligence” of a program, but without the ability to actually read and execute instructions. All the logic will instead be hardwired.
1. The clock

There will be a register in this lab, and registers need clocks. First, build this thing shown to the right, which makes it a little easier to interact with sequential circuits and will be used in all the labs and the project in the future. It is composed of:
- one Wiring > Clock component
- one Input/Output > Button component
- one OR gate (there’s a button for OR in the toolbar)
- one Wiring > Tunnel, named
CLK. (I colorCLKyellow but you can color it whatever. Or don’t, if you hate Fun.)
The CLK tunnel will be used to connect the clock signal to every register in your circuit. You will do that by copying and pasting the CLK tunnel wherever you need it. This circuit will only have one register, but in the future you will have more.
This funny arrangement gives us flexibility for how to tick the clock. There are three ways:
- If you hit Ctrl+T (or ⌘T on mac), the clock will do a “half tick” (0 to 1, or 1 to 0).
- So, you have to hit it twice for a full clock cycle.
- If you use the 👆 Hand tool to click on the clock component, the clock will do a “half tick.”
- Again, you have to click it twice for a full clock cycle.
- If you use the 👆 Hand tool to click on the button, it does a full clock cycle in one click!
- It’s just a little more convenient than the other two methods.
Components (subcircuits)
A component or subcircuit is kind of like a function: you have inputs (“parameters”) and outputs (“return values”). You must use components in your second project, as they will be very helpful in organizing the many parts of your CPU. For this lab, the component will make your main circuit much cleaner, and will also make your lab easy to automatically grade.
Components in Logisim have some neat features:
- You can reuse a component as many times as you want (put as many copies as you want)
- You can look inside components while your circuit is running, for debugging
- You can make them look any way you want, too!
- You can be a component artist lol
2. Creating the game component
- Do Project > Add Circuit… from the menu bar in Logisim.
- When it asks for a name, call it
THE GAME. All capitals. please do this to make autograding possible. - When you hit OK, the main circuit disappears, and you are now editing the new circuit. You can tell because on the left side, you’ll see this:
 To switch which one to edit, just double click their names there.
Make sure you are editing THE GAME, and:
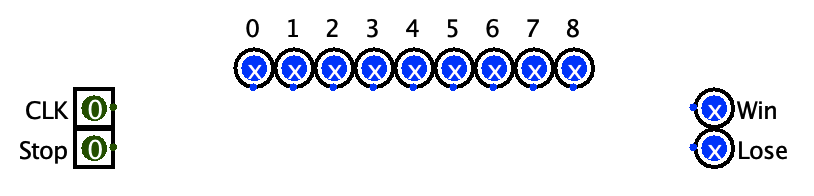
- Create 2 1-bit inputs and 2 1-bit outputs and arrange them like this.
- Now switch to editing the
maincircuit. On the left side, single-clickTHE GAME, then place it on the main circuit. You should see this: - Place your mouse cursor over one of the blue dots on the sides of the component you just placed, and let it sit there for a second or two. A message should pop up like this:
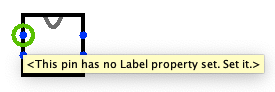
- If it doesn’t show you that message: are you sure you’re using the newest version of Logisim? It should be
2241_1103.


See, each input and output has a name, set by its Label property. Inputs and outputs are how we get values into and out of components, and it’s very important that you name your inputs and outputs properly so that you can tell which is which.
To fix this:
- Switch back to editing
THE GAME. - Change the
Labelproperties of each input and output to match this image.
- It’s very important that the top input be
CLKand the bottom beStop; and that the top output beWinand the bottom output beLose. This is for autograding purposes.
- Once you’ve done that, go back to
mainand hover over the dots on the sides again. You should see the input and output names that you just set!

Cool, now we just have one more set of outputs to add:
- Switch back to editing
THE GAME. - Create a new output at the top of your circuit.
- While it’s selected, use the down arrow on your keyboard to make it face down (or change its “Facing” property to “South”)
- Set its “Label” to
0 - Set its “Label Location” to “North”
- You should now have this:
- Now duplicate that 8 times and place/rename them to match this image:
- If you now go back to
main, you’ll see this: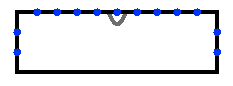 W I D E component

Notice that the direction that the inputs/outputs are facing determines on which side they will appear when you place the component! The 0 through 8 outputs are on top because they are facing South inside THE GAME.
It’s very important that your component look exactly like this for autograding purposes. Please make sure it matches the image above!
3. The “Light chaser” outputs
Time to build a classic bit of electronic fun, a “chaser” or “sequencer.” These have been used in automated signs, displays, and holiday lights for decades.
Inside THE GAME, you’re going to build this (instructions after the image):
Here’s what you’ll use:
- one Plexers > Decoder set to 4 Select Bits
- click the decoder and hit the arrow keys on your keyboard to make it face that direction.
- if for some reason the arrow keys don’t change the direction,
- let me know! this seems to be a weird intermittent bug?? I need people reporting it to figure it out
- change its “Facing” property to “North”, that should do it
- one input set to 4 bits
- lots of wires
- I know I stress using tunnels over long wires when possible, but tunnels would be kind of awkward and ugly here. I think using long wires is okay as long as it Looks Cool™

- Just be careful about bridging together outputs of the decoder. If you see big circles on the outputs of the decoder, those outputs are connected and will cause red error wires in the future. You can disconnect them by clicking on one and dragging to the other.
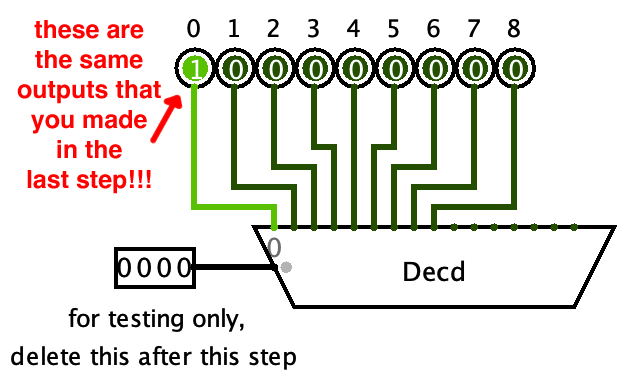
- It’s important that output 0 of the decoder is connected to your output 0.
So what the heck does a decoder do? Play around with the input and see. This one takes a 4-bit number as its input, and turns on exactly one output, based on that number. If you input 0000, output 0 turns on. If you input 0001, output 1 turns on. And so forth. (Decoders will come back up in the project!)
What about the rest of the decoder’s outputs? We’re just not using them for this lab. We’ll never put a value > 8 into it, so it won’t matter.
Once you’re satisfied everything is working, delete the input, because it was just for testing and we are about to replace it with something much cooler.
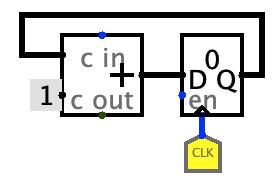
4. Making a register count up
You are going to use a register to keep track of a number. That number will increase by 1 every tick of the clock, and that number will be fed into the decoder.
Here’s how you’ll make it:
- Go to the materials page, download the
simple_counter.circexample, and look at how it works.- (You have to use Logisim’s File > Open menu item to open it.)
- It’s a register whose
Qoutput feeds into an adder, whose other input is a constant 1. - The output of the adder feeds back into the same register.
- The clock is connected to the register’s clock input (the triangle).
- When you tick the clock, the value in the register is incremented by 1.
- Don’t copy and paste that into your circuit. Get some practice making your own version with these components:
- a Memory > Register, with its “Data Bits” set to 4
- an Arithmetic > Adder, with its “Data Bits” set to 4
- a Wiring > Constant, with its “Data Bits” set to 4 and its value to
0x1- tip: click on the constant in the circuit, and then just type a number on your keyboard.
- Then:
- Go to the
maincircuit - Copy the
CLKtunnel that you created earlier - Go back to
THE GAME - Paste that tunnel and connect it to the register
- Go to the
When all is said and done, you should have something like this:
Now, to tick the clock, hit Ctrl+T/⌘T.
Nothing happens.
Uh.
What?
Tunnels can’t cross circuits!
Tunnels are like local variables. Every circuit gets its own set of tunnels. The CLK tunnel on the main circuit is a different tunnel from the CLK tunnel in THE GAME.
You cannot use tunnels to pass values into and out of components. The only way to do that is with inputs and outputs. That’s why we made the CLK input earlier!
So now, duplicate the CLK tunnel and attach it to the CLK input you made earlier, like this:
Now, to test it, use the hand tool to poke the CLK input to toggle it between 0 and 1 over and over. Every full clock cycle, the value in the register should increment by 1. It will go 0, 1, 2, 3, 4, 5 …. c, d, e, f, then 0 again. If it does, great! Your register is working! If not, get help!
Resetting
You can also do this with Simulate > Reset Simulation, but resetting is so common that you should just get used to using the keyboard to do it.
Try poking the CLK input a few times so that the register contains some non-zero value. Now, hit Ctrl+R/⌘R. This resets everything in the circuit. Resetting:
- sets all inputs to 0
- sets all registers to 0
- clears the contents of any RAM components (when we start using those…)
Resetting sometimes also fixes minor weird problems with Logisim. If you ever get wires behaving strangely, or values not moving through wires correctly, try resetting. It might work. (lol.)
Get used to resetting! It’s a very useful thing when testing your circuits. Think of it like running a program from the beginning, instead of starting somewhere in the middle. Resetting also puts the circuit into the same state as when it is first opened in Logisim, and is therefore how the graders will see your circuit.
5. Connecting the register to the decoder
Make a tunnel connected to the Q output of the register, called count or something.
Don’t use the output of the adder. Use the Q output of the register.
Now, you’re going to make some logic that comes up with the value that goes into the decoder’s select input. It’s going to work like this:
if(count < 9)
    decoderSelect = count;
else
    decoderSelect = 0 - count;
To make this you’ll need:
- a MUX (multiplexer)
- an Arithmetic > Comparator, with “Numeric Type” set to “Unsigned”!!!
- an Arithmetic > Subtractor
- some Wiring > Constants
Go for it. The output of this circuit will go to the decoder’s select input.
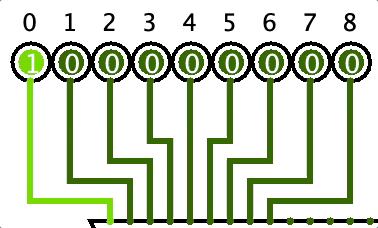
What does all of this logic do? It makes the decoder see the sequence 0, 1, 2, 3, 4, 5, 6, 7, 8, 7, 6, 5, 4, 3, 2, 1. That will make the decoder’s outputs turn on from left to right, then right to left.
To test this,
- Reset
- The decoder’s 0 output should be on (1)
- Poke the
CLKinput repeatedly - The decoder’s outputs should turn on in sequence like 1, 2, 3, 4…
- After the decoder’s 8th output turns on, the next thing that turns on should be 7!
- Then it goes back to the left, 6, 5, 4, 3…
- Until it reaches 0 again and it starts all over! See the animation below.
6. Hooking it up on the main circuit
I bet your finger is tired of clicking. Let’s make it automatic.
- Go to the
maincircuit. - Create 9 LEDs hooked up to the top outputs of the game as shown below.
- You can change the “On Color” of the middle LED to hex
00FF00to make it green instead of red (which makes sense later).
- You can change the “On Color” of the middle LED to hex
- Duplicate the
CLKtunnel and connect it to theCLKinput of the game as shown below.

Now:
- Reset. The first LED should be lit up.
- Tick the clock one cycle by clicking the button that goes into the OR gate. The second LED should light up.
- Keep ticking. Each LED should light up in sequence.
- This is why it’s called a “chaser” - it’s like the light from the LEDs is chasing something from left to right!
- Then, after getting to the right side, the LEDs should start lighting up right-to-left.
Finally, you can make it go automatically like so:
- In the menu at the top of Logisim, Simulate > Tick Frequency > 16 Hz
- Then, Simulate > Ticks Enabled
And watch it go! This is pretty much exactly how some christmas lights, decorative lights, “neon” signs etc. work.
You can Simulate > Ticks Enabled again to make it stop.
But this isn’t a game yet. Games have inputs and outputs and rules!
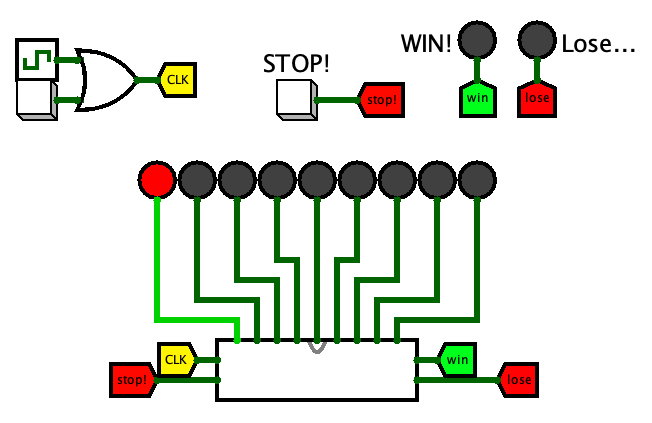
7. Making it into a game
Here is how the game will work:
- The clock is ticking and so the LEDs are lighting up in sequence.
- The user will have a button that they can press.
- If they press the button at the right time - when the middle LED is lit up - a “Win” LED lights up to tell them they won.
- If they press the button at the wrong time - when any other LED is lit up - a “Lose” LED lights up to tell them they lost.
I know, it’s not exactly the MIPS game project…
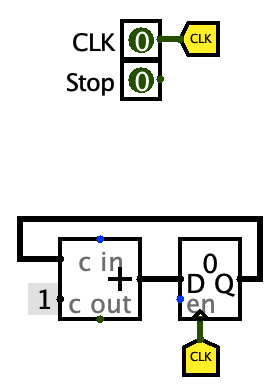
First, let’s set up the user interface for the game. The LED chaser you just made is part of that interface, but we need a few more things - an Input/Output > Button and two more LEDs, with some tunnels attached to them. See the below image for what I mean and follow my example.
7.1 Stopping the register from counting
The button you just made is the “stop” button. When you press it, two things should happen:
- the register should stop counting up (i.e. it should be disabled)
- some other logic will decide if you won or lost
Let’s do the “stop counting” part first.
Go back into THE GAME and look at the register. Right now you are using the D input on the left, the clock input on the bottom, and the Q output on the right. But you are not using the en input on the left. Remember that this is the write enable for the register. Because we have nothing connected, it is always enabled and will change on every clock tick.
What we want is the following: if stop is 0, enable the register (input a 1 for its write enable). If stop is 1, disable the register (input a 0 for its write enable). The logic for this is a single gate, the simplest gate. Please get this.
To test it:
- Go back to
main - Simulate > Ticks Enabled. The lights should light up in sequnce like before.
- Then, with the 👆 Hand tool, click and hold down the “stop” button you just added. The register should stop counting up, causing the light animation to stop.
- When you let go of the button, the register will resume counting up, and the animation will too.
7.2 Deciding if you won or lost
The goal of the game is to hit the stop button when the middle LED (LED 4) is lit up. That’s why I suggested you change its “On color” property!
Back in THE GAME:
-
Connect a tunnel to output 4 like so.
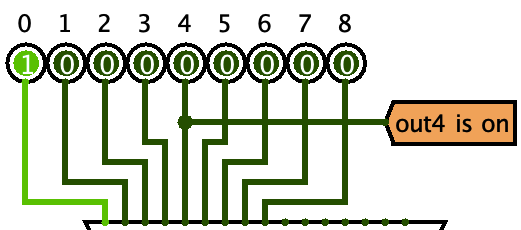
-
Now make the logic for the
winandloseoutputs. I am just giving you the boolean expressions and trusting that you can make the appropriate gates and connections (using TUNNELS and not SUPER LONG WIRES that MAKE NO SENSE). Remember, you do this inside THE GAME, not on the main circuit.win = (out4 is on) & stoplose = ~(out4 is on) & stop(don’t forget,~is NOT)
Now you can play the game.
- Go back to
main. - Turn on Simulate > Ticks Enabled with the frequency set to 16Hz.
- With the hand tool, try to press the stop button when the middle LED is lit up.
- If you do it right, the “Win” LED lights up!
- If you do it wrong, the “Lose” let lights up.
- And when you let go of the button, the win/lose LEDs go dark, and the animation resumes.
If the win and/or lose LEDs light up even when you are not pressing stop, then your logic for the win and lose outputs in THE GAME are wrong.
Try changing the Simulate > Tick Frequency to change the difficulty of the game. (I feel like 32Hz is about the fastest you can go and still have better-than-luck chance of getting it lol… at 64Hz the screen can’t keep up)
Submitting
Gradescopeeeeeeeeeeeeeeee